

A Detailed Guide To Build Surface Crack Identification Model


Table of Contents
Introduction
Even though surface fractures are invisible to the naked eye, they have the ability to jeopardize the structural integrity of important components. Modern technology are embraced in our quest for increased safety in the digital age.
It explores the field of surface fracture detection with the help of sophisticated CNNs. We travel across the complex worlds of materials science and civil engineering as we investigate a script that could reveal microscopic risks. Past the code's lines of expression is a story of accuracy and a watchful gaze over the surfaces that sustain our day-to-day existence.
Come along on this trip with us as we unravel the language of fractures and cultivate a future where structural weaknesses receive the utmost attention and correction. Greetings from the cutting edge of structural integrity, where transparency meets imperceptibility.
Let's start building our model.
Model building
1.Importing Libraries
The necessary libraries are imported, including TensorFlow for deep learning, shutil for file operations, and Matplotlib for visualization.
import os
import shutil
import tensorflow as tf
import matplotlib.pyplot as plt
import matplotlib.image as mpimg
import random
2.Data Collection and Preprocessing
The paths to the directories containing positive (cracked) and negative (non-cracked) images are specified.
positive_dir = '/kaggle/input/surface-crack-detection/Positive/'
negative_dir = '/kaggle/input/surface-crack-detection/Negative/'
The number of images in each class is determined using os.listdir to list files in each directory.
positive_images = os.listdir(positive_dir)
negative_images = os.listdir(negative_dir)

len(positive_images), len(negative_images)

3.Model Configuration and Training
A train-validation split is performed by selecting 80% of images for training and 20% for validation.
# Making train val split
train_positive_images = positive_images[:int(.8*(len(positive_images)))]
val_positive_images = positive_images[int(.8*(len(positive_images))):]

train_negative_images = negative_images[:int(.8*(len(negative_images)))]
val_negative_images = negative_images[int(.8*(len(negative_images))):]
New directories for training and validation data are created.
train_dir = './train_data/'
val_dir = './val_data/'

os.makedirs(train_dir + 'Positive/')
os.makedirs(train_dir + 'Negative/')

os.makedirs(val_dir + 'Positive/')
os.makedirs(val_dir + 'Negative/')
Images are copied from the original directories to the newly created training and validation directories based on the train-validation split.
for image in train_positive_images:
    src = positive_dir + image
    dst = train_dir + 'Positive/'
    shutil.copy(src, dst)

for image in train_negative_images:
    src = negative_dir + image
    dst = train_dir + 'Negative/'
    shutil.copy(src, dst)

for image in val_positive_images:
    src = positive_dir + image
    dst = val_dir + 'Positive/'
    shutil.copy(src, dst)

for image in val_negative_images:
    src = negative_dir + image
    dst = val_dir + 'Negative/'
    shutil.copy(src, dst)
4.Analysis and Visualization
A function, view_random_image, is defined to visualize a random image from a specified class.
def view_random_image(target_dir, target_class):
    target_folder = target_dir + target_class + '/'
    random_image = random.choice(os.listdir(target_folder))

    img = mpimg.imread(target_folder + random_image)
    print(img.shape)
    plt.title(target_class)
    plt.imshow(img)
    plt.axis('off')
A random positive image is displayed for visualization.
view_random_image(train_dir, 'Positive')

ImageDataGenerator is used for real-time data augmentation during training. Images are rescaled by dividing pixel values by 255.
train_data_gen = tf.keras.preprocessing.image.ImageDataGenerator(rescale = 1/255.)
val_data_gen = tf.keras.preprocessing.image.ImageDataGenerator(rescale = 1/255.)
Flow from Directory is used to create train and validation data generators, specifying the target size and binary class mode.
train_dataset = train_data_gen.flow_from_directory(train_dir,
                                                  target_size = (227,227),
                                                  class_mode = 'binary')

val_dataset = val_data_gen.flow_from_directory(val_dir,
                                              target_size = (227,227),
                                              class_mode = 'binary')

5.CNN Model
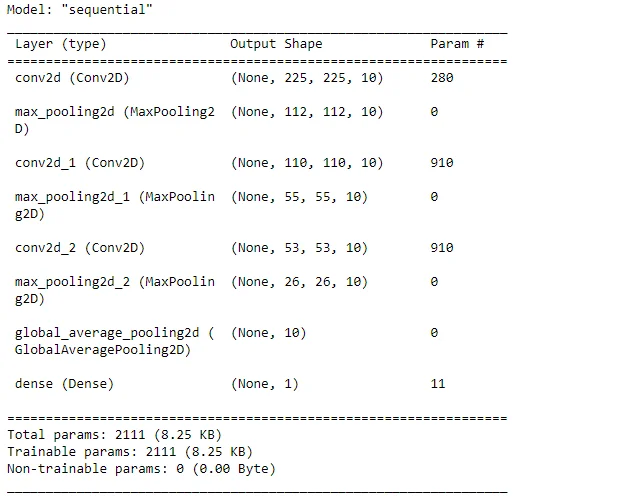
A simple CNN model is defined using the Sequential API with convolutional layers, max-pooling layers, and a global average pooling layer. The output layer has a sigmoid activation for binary classification.
input_shape = (227,227,3)

model = tf.keras.Sequential([
    tf.keras.layers.Input(shape = input_shape),

    tf.keras.layers.Conv2D(10, 3, activation = 'relu'),
    tf.keras.layers.MaxPool2D(),
    tf.keras.layers.Conv2D(10, 3, activation = 'relu'),
    tf.keras.layers.MaxPool2D(),
    tf.keras.layers.Conv2D(10, 3, activation = 'relu'),
    tf.keras.layers.MaxPool2D(),

    tf.keras.layers.GlobalAveragePooling2D(),

    tf.keras.layers.Dense(1, activation = 'sigmoid')
])
The model is compiled with binary crossentropy loss, accuracy metric, and the Adam optimizer.
model.compile(loss = 'binary_crossentropy',
             metrics = ['accuracy'],
             optimizer = 'adam')
The summary of the model architecture is printed.
model.summary()
Early stopping is implemented with a callback to stop training when validation accuracy stops improving.
early_stopping = tf.keras.callbacks.EarlyStopping(monitor = 'val_accuracy',
mode = 'max', patience = 15)
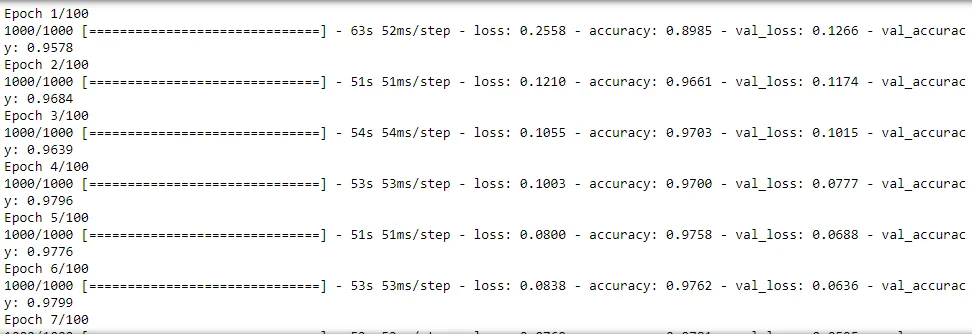
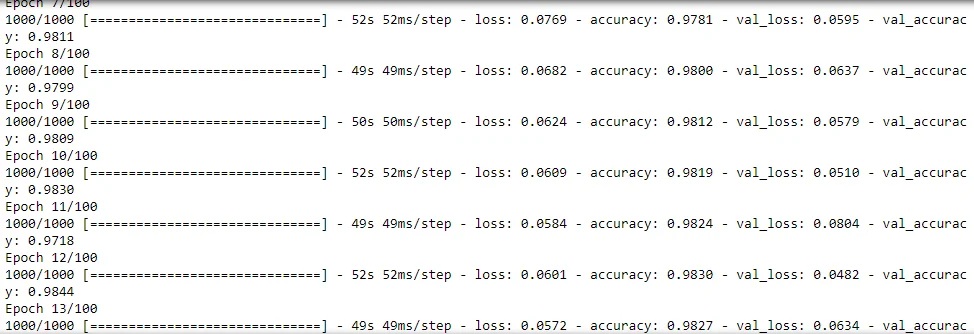
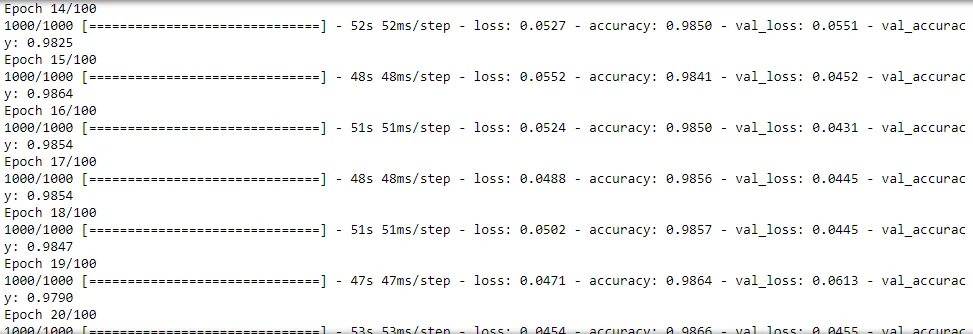
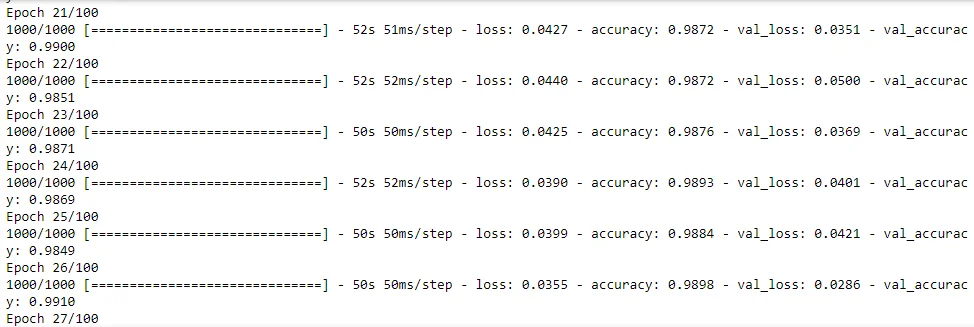
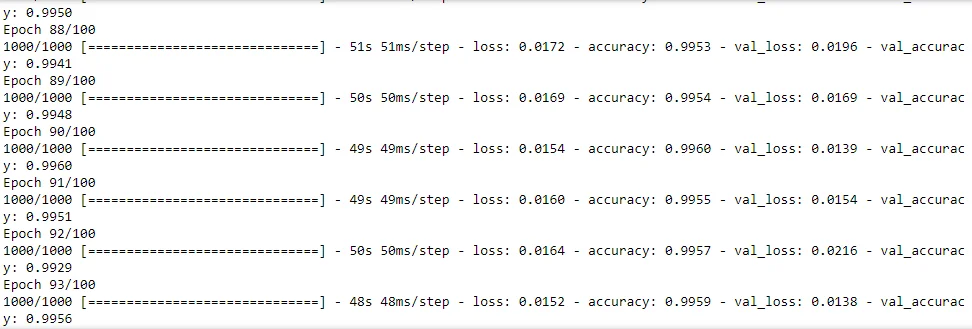
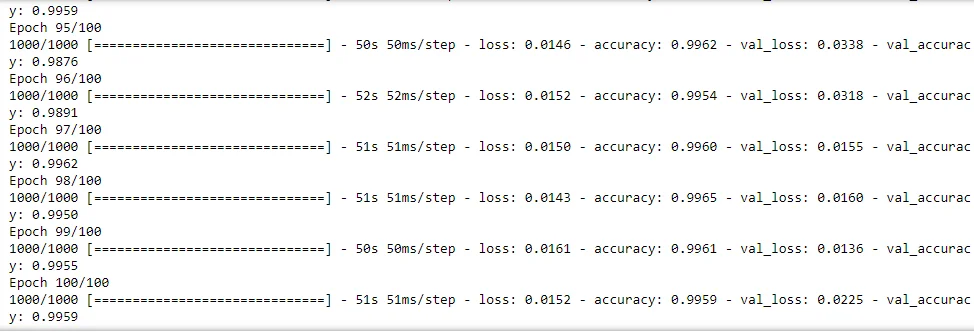
The model is trained on the training dataset with 100 epochs, and early stopping is applied.
history= model.fit(train_dataset,
                  epochs = 100,
                  validation_data = val_dataset,
                  callbacks = [early_stopping])
Conclusion
Our investigation into surface crack detection comes to a close with both a promise and a revelation in the quest for structural integrity. With the help of Convolutional Neural Networks, we have been able to interpret the nonverbal signs of fractures that threaten the stability of important structures. We are committed to developing safety measures while the code operates. Along with strengthening our knowledge of structural vulnerabilities, the journey through data, photos, and algorithms has also made clear the way forward for preventive measures. We see a future where microscopic risks are recognised, treated, and avoided, even beyond the lines of code. Let this journey serve as a monument to our steadfast commitment to strengthening our foundations and to preserving tomorrow, today.
Frequently Asked Questions
1.How do you identify structural cracks in concrete?
Cracks in structural foundations can vary in size and shape and are often larger than 3 mm. There's a chance the crack has a wider end than the other. There could be an uneven or flush patch of concrete on each side of the crack. In walls made of brick or cinder block, a stair-step crack pattern is a common structural crack pattern.
2.What is crack detection of structures?
The most popular techniques for crack identification are image-based techniques (such as morphological, skeletonization, filtering, thresholding, etc.).
3.What is crack identification?
The technique of identifying and locating surface cracks, such as those in materials, structures, or pictures, is known as crack identification. It is an essential component of quality assurance and structural health monitoring in a number of industries, including manufacturing, materials research, and civil engineering.
Looking for high quality training data to train your surface crack identification model? Talk to our team to get a tool demo.

Simplify Your Data Annotation Workflow With Proven Strategies
.png)
