

What is MCP & How It Speeds Up AI Agent Building 100X
Model Context Protocol (MCP) structures and manages context in LLMs, improving accuracy and efficiency.

I still remember the day I decided to automate my LinkedIn posts.
"This should be easy. I'll just use Selenium to log in and post updates automatically.", I thought.
But what started as a simple project quickly turned into a nightmare.
At first, everything seemed fine, I wrote a script, tested it, and watched it work. But then, the problems began.
The Pain Points
- Code broke constantly – Every time a library updated, my script failed. I had to keep adjusting dependencies and debugging errors.
- LinkedIn changed its UI – XPath and CSS selectors I used became useless overnight. Every UI update meant I had to fix broken selectors just to keep the automation running.
- OAuth 2.0 was a nightmare – Direct API access required OAuth authentication, and handling tokens manually was a painful process. Managing refresh tokens, scopes, and security became more work than writing the posts themselves.
Frustrated, I thought, "Maybe AI agents can help."
The AI Agent Experiment
I built a multi-agent system with:
1. Style fetcher to analyze my past posts.
2. Post generator to write content like I do.
3. Poster agent to publish posts automatically.
It looked promising. The agents could generate posts, and I didn’t have to write every single update myself. But soon, I ran into a whole new set of issues.
- Agents hallucinated – They sometimes created incorrect post formats or missed key details from my writing style.
- OAuth 2.0 failures – Managing tokens still caused problems, and my agents failed to authenticate consistently.
After weeks of struggling with Selenium and AI agents, I had almost given up. My automation was fragile, unreliable, and constantly breaking.
Every fix led to a new problem. I was spending more time debugging than actually posting on LinkedIn.
Then, I stumbled upon MCP (Model Context Protocol). At first, I wasn’t sure what it was. Another framework?
Another tool that required endless setup? But as I dug deeper, I realized MCP was exactly what I needed.
1. What is MCP?

MCP standardizes how AI tools interact with platforms like LinkedIn. Instead of struggling with APIs, OAuth tokens, and prompt engineering, MCP lets AI access pre-built servers that handle everything in the background.
Instead of writing complex code, I could just connect to MCP servers and let them do the work.
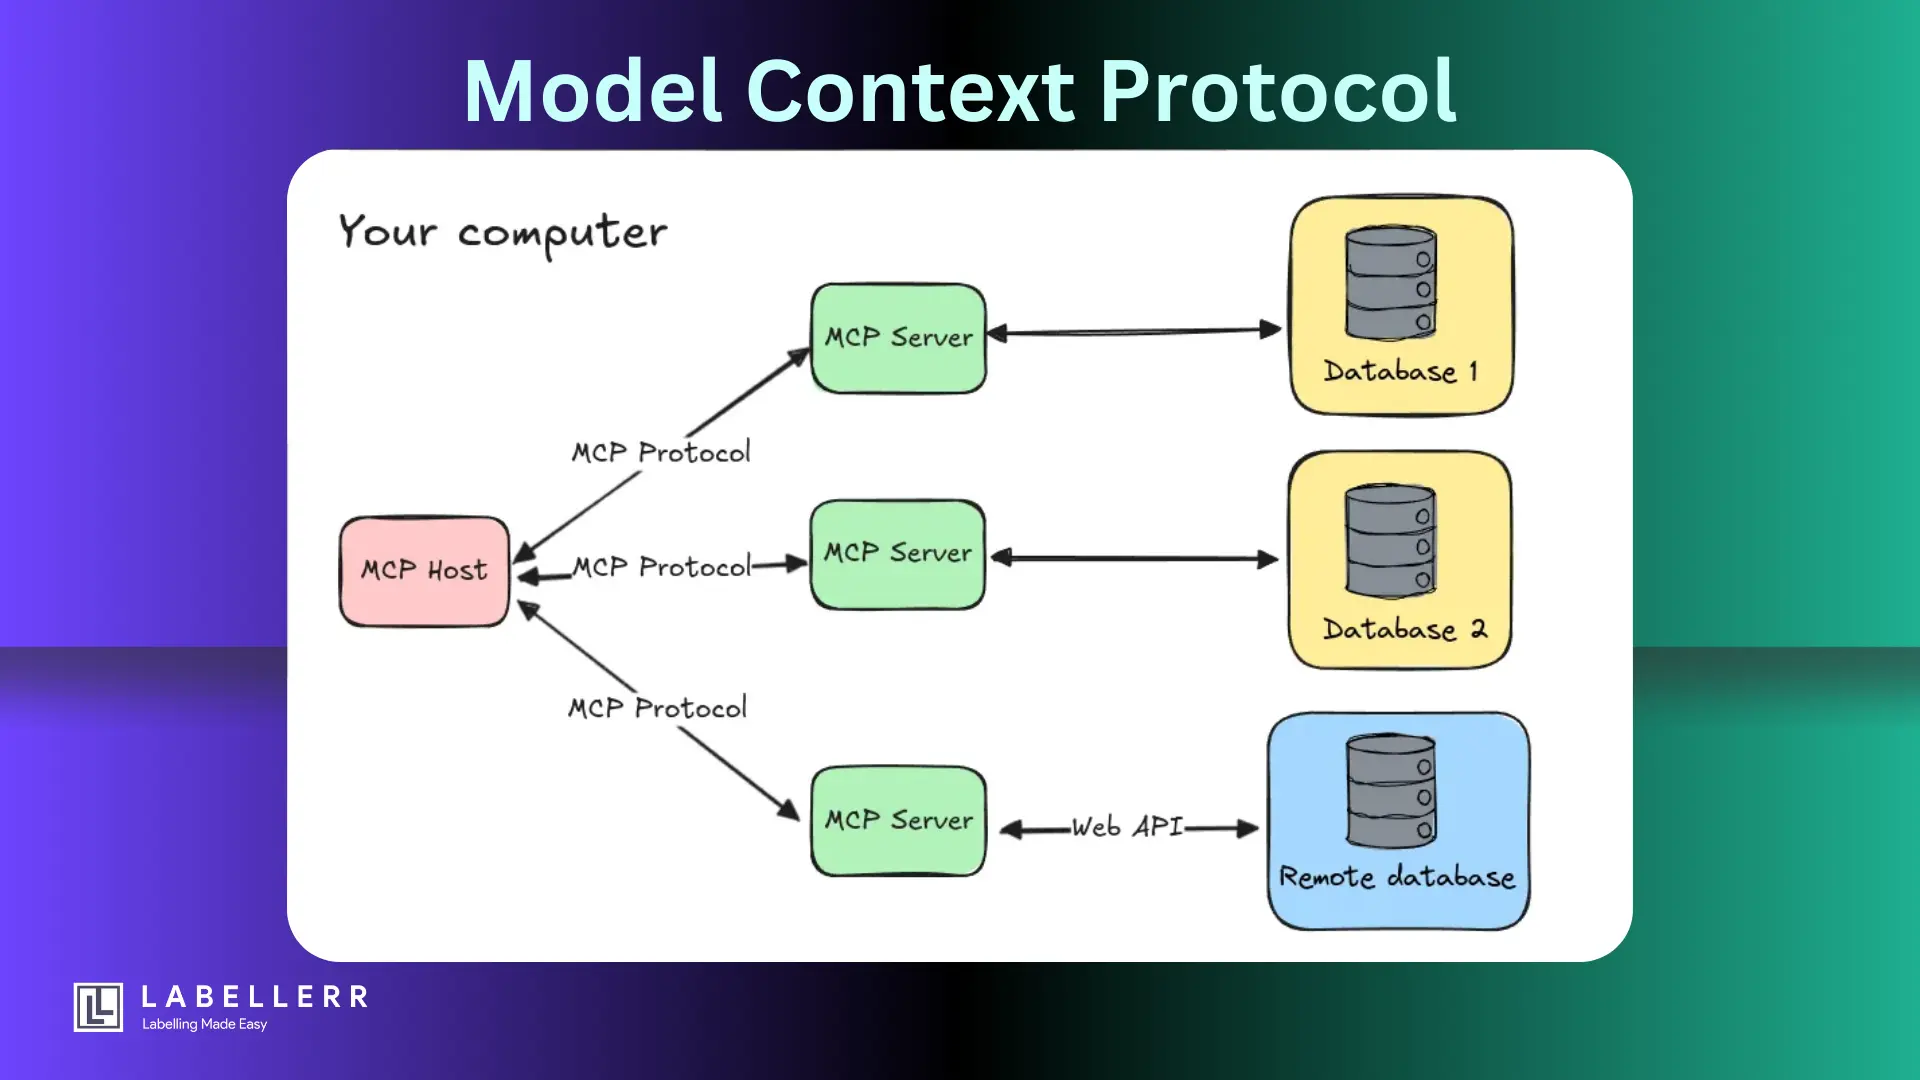
2. How MCP Works?
At first, MCP sounded complex, another fancy AI framework. But once I started using it, I realized it was actually simple and powerful. MCP isn’t just a tool, it’s a system that makes AI work better by connecting it with real-world data and actions.
How MCP is Built?

MCP has four key components that make it work smoothly:
1. Model (M) – The Brain of the System
This is the AI model (like Claude or GPT-4) that processes user requests. It doesn’t work alone—it needs access to real tools and data. MCP acts as a bridge, letting AI interact with APIs, databases, and real-time information.
2. Context (C) – The Information Source
The AI model needs relevant data to give accurate responses. MCP helps by providing:
- Tools – Functions AI can call, like checking a database or making an API request.
- Resources – External files, databases, or real-time feeds.
- Sampling – The ability to ask other AI models for specialized tasks.
- Prompts – Structured templates that make AI queries more precise.
3. Protocol (P) – The Communication System
MCP defines how AI talks to tools. It has built-in features that help AI understand what’s available and how to use it:
- Reflection – Lets AI discover available tools dynamically. No need for manual configuration.
- Transports – MCP supports different ways to send and receive data:
- Standard I/O – Direct communication via terminal.
- Server-Sent Events (SSE) – A streaming method for real-time data.
4. Servers & Clients – The Action Handlers
MCP works with servers that host tools and clients that make requests.
- MCP Servers – Act as tool providers, like a weather API server.
- MCP Clients – Apps like Claude Desktop, which ask servers for data.
Why MCP Made My Life Easier?
MCP already had three helpful LinkedIn servers ready to use:
- LinkedIn MCP Server (GitHub Repo) – This server created new LinkedIn posts, eliminating the need for manual content formatting and submission. No more AI hallucinations or broken post structures.
- HDW MCP Server (GitHub Repo) – This server retrieved my past LinkedIn posts with a single request. I could use it to analyze my writing style, extract engagement metrics, or repurpose old content.
- ChatGPT-x-DeepSeek-x-Grok-x-Claude MCP Server (GitHub Repo) – This server-generated new LinkedIn posts based on the content retrieved by the HDW MCP Server.
It analyzed past posts and wrote new ones on the topics I wanted to cover, ensuring consistency in tone and style.
I felt relieved. No more XPath errors, no more token failures, and no more hours wasted on debugging. I could finally focus on creating content instead of fixing code.
3. Step-by-Step Implementation with MCP
After setting up MCP, I wanted to keep things simple. Instead of relying on complex AI agents, I realized I could just use Claude Desktop as my content generator. My only real needs were:
- Fetching my past LinkedIn posts
- Generating a new post based on my past writing style
- Posting it on LinkedIn automatically
MCP already had the right tools for this:
- HDW MCP Server (GitHub Repo) – Fetched my past LinkedIn posts so I could analyze my writing style.
- LinkedIn MCP Server (GitHub Repo) – Handled posting directly to LinkedIn via the official API.
Step 1: Set Up and Run the MCP Servers
First, clone and install both servers.
1. Clone the Repositories
# Clone the LinkedIn Post Creator MCP Server
git clone https://github.com/fredericbarthelet/linkedin-mcp-server
cd linkedin-mcp-server
pnpm install

# Clone the HDW MCP Server (for fetching past posts)
cd ..
git clone https://github.com/horizondatawave/hdw-mcp-server
cd hdw-mcp-server
npm install
2. Configure Each Server
Both servers require some environment setup before running.
For LinkedIn MCP Server
- Create an
.envfile and set up LinkedIn OAuth credentials.
cp .env.template .env && vi .env
- Add your LinkedIn client credentials (found in your LinkedIn Developer account) and set
JWT_SECRETto a random string.
For HDW MCP Server
- Register at HorizonDataWave to get your API Key and Account ID.
- Create an
.envfile in the root of the project and add:
HDW_ACCESS_TOKEN=your-hdw-access-token
HDW_ACCOUNT_ID=your-hdw-account-id
3. Start the Servers
Once everything is configured, run both servers.
Run LinkedIn Post Creator
cd linkedin-mcp-server
pnpm run dev
The server will start at http://localhost:3001.
Run HDW MCP Server
cd ../hdw-mcp-server
npm start
The server will start at http://localhost:3002.
Step 2: Fetch Past LinkedIn Posts
Once the HDW MCP Server is running, use it to fetch past posts.
Python Code to Fetch Posts
from mcp_client import MCPClient

# Initialize MCP client
client = MCPClient()
client.connect_server("linkedin-post-retriever", "http://localhost:3002")

# Fetch past posts
past_posts = client.request("linkedin-post-retriever", "get_linkedin_user_posts", {"user_id": "your-profile-id"})

# Save posts for reference
with open("past_posts.txt", "w") as f:
    f.write("\n\n".join(past_posts))

print("Fetched past posts successfully!")
Step 3: Generate a New Post Using Claude Desktop
Instead of relying on an MCP server for post generation, I used Claude Desktop.
- Open Claude Desktop.
- Drag and drop the
past_posts.txtfile. - Prompt Claude: "Analyze my past posts and generate a new LinkedIn post about AI automation."
- Copy the generated post and save it in
new_post.txt.
Step 4: Post to LinkedIn Automatically
Now, I use the LinkedIn MCP Server to publish the post generated by Claude.
Python Code to Publish the Post
# Connect to LinkedIn MCP Server
client.connect_server("linkedin-post-creator", "http://localhost:3001")

# Read the generated post from Claude
with open("new_post.txt", "r") as f:
    post_content = f.read()

# Publish the post
client.request("linkedin-post-creator", "create-post", {"content": post_content})

print("Post successfully published on LinkedIn!")
4. Why MCP Outperformed Selenium & Agents
| Aspect | Selenium | AI Agents | MCP |
|---|---|---|---|
| Setup Complexity | High (browser drivers, selectors) | Moderate (prompt engineering) | Low (pre-built servers) |
| Maintenance | Fragile (breaks on UI updates) | Unreliable (hallucinations) | Robust (versioned APIs) |
| Security | Manual OAuth handling | Token leaks risks | Automated, encrypted token management |
| Code Length | 200+ lines | 50-100 lines | 10 lines |
Key Takeaways:
Looking back at my LinkedIn automation journey, I realized a few important lessons.
1. Don’t Reinvent the Wheel
At first, I tried to build everything from scratch with Selenium and AI agents. But MCP already had the tools I needed.
Instead of spending hours fixing code, I could just use pre-built servers to handle post-creation, authentication, and publishing.
2. Focus on Value, Not Glue Code
Before using MCP, I spent more time debugging broken scripts than actually writing good LinkedIn posts.
Now, I let MCP servers handle OAuth, formatting, and API calls. This means I can focus on creating content instead of fixing XPath errors or token issues.
3. Scalability Without Extra Work
With MCP, I can easily expand my automation. Want to track post performance? Just add an analytics server. Need to post on Twitter or Instagram? Add a cross-posting server. No need to rewrite my entire workflow—just connect new MCP servers when needed.
Future-Proofing with MCP
I also discovered that MCP keeps evolving, which means my automation can improve over time without extra work.
Upcoming Servers That Will Make Automation Even Better
- mcp-server-linkedin-analytics – This will help track how well my LinkedIn posts perform. No more guessing which posts get the most engagement.
- mcp-server-crosspost – This will allow me to share posts on multiple platforms like Twitter and Substack with a single command.
Why should you care about this?
Large companies need compliance and governance for automation tools. MCP servers can be audited, which makes it easier for teams to approve and monitor AI-based automation.
Conclusion
I started this journey frustrated and exhausted. My Selenium scripts kept breaking, and my AI agents couldn’t generate reliable posts. I was drowning in OAuth errors, API docs, and debugging nightmares.
Then, I found MCP.
By using pre-built servers, I replaced a 500-line fragile script with a simple 10-line workflow. No more XPath errors, no more token refreshes, no more wasted time. Now, I focus on content, while MCP handles everything in the background.
If you’re a developer struggling with API headaches, OAuth issues, or automation that constantly breaks, MCP is the answer.
FAQs
What is a Model Context Protocol?
Model Context Protocol (MCP) is a method that helps LLMs manage and retrieve relevant information efficiently, improving their responses.
What is MCP in LLM?
MCP in LLMs helps structure and control context, making AI models more accurate and responsive by handling data in a systematic way.
What is the difference between MCP and RAG?
MCP organizes and structures context for better model responses, while RAG (Retrieval-Augmented Generation) fetches external data dynamically to enhance answers.

Simplify Your Data Annotation Workflow With Proven Strategies
.png)
