

Hands-On Guide to Building a Motion Heatmap

In retail analytics, optimizing store layouts to enhance customer experience is a constant challenge. Traditional methods often lack real-time insights, leaving retailers looking for solutions. With the rise of AI, a popular solution to this problem has been developed - the motion heatmap. By tracking and visualizing customer movements, it offers actionable insights for strategic store layout adjustments, improving navigation and ultimately boosting sales.
A Motion Heatmap
A motion heatmap is a visualization technique used in video analytics to represent the spatial distribution of motion within a scene over time. Unlike traditional heatmaps that represent static data, a motion heatmap highlights areas of activity and movement within a video sequence.
In this blog post, we'll delve into creating a motion heatmap with OpenCV using Gaussian background subtraction.
Gaussian Background Subtraction
Gaussian background subtraction is a fundamental technique in video processing applications like object tracking and motion detection.
At its core, the method relies on modeling the background of a scene as a Gaussian distribution. This background model is learned over time from a sequence of video frames captured in the absence of foreground objects (e.g., people, vehicles).
How it works:
- Background Modeling: Gaussian background subtraction begins with the creation of a background model, typically through an averaging or accumulation process of multiple frames captured from a stationary scene. This model represents the expected appearance of the background without any foreground objects.
- Gaussian Distribution: Each pixel in the background model is assumed to follow a Gaussian distribution, representing the expected intensity values for that pixel over time. This distribution helps in capturing the variability in pixel intensity due to factors like lighting changes or camera noise.
- Subtraction: When a new frame is captured, it is compared pixel-by-pixel to the corresponding pixels in the background model. The difference between the pixel intensity in the current frame and the corresponding pixel in the background model is calculated. If this difference exceeds a predefined threshold, the pixel is considered as potential foreground.
- The background model gets updated to handle gradual changes in the scene. This is often done by blending the current frame with the existing background model. Then, the binary mask from background subtraction is used to make a motion heatmap, showing where motion happens in the scene.
Code
The steps are as follows:
- Import Relevant Libraries
- Create function for creating video from static frames.
- Creating frames from our input video
- Applying background subtraction on all the frames.
- Applying color mapping to the accumulated images.
- Creating video from the accumulated images to see the motion heatmap.
Importing Libraries
Pandas , NumPy and Matplotlib are standard data science libraries. Os module provides functions to work with directories and files. The copy module is essential for creating deep copies of objects in Python, which can be particularly useful when working with mutable data structures. The Bar class from the progress.bar module is used to track the progress of tasks in the console or terminal.
import pandas as pd
import numpy as np
import cv2
import matplotlib.pyplot as plt
import os
import copy
import re
from progress.bar import Bar
Creating a Video from Image Frames
The extract_digits is a helper function used for the natural_keys function to achieve natural sorting of filenames based on the numerical sequence within them. This will be used to make video from a set of frames in the right order.
def extract_digits(text):
return int(text) if text.isdigit() else textdef natural_keys(text):
substrings = re.split(r'(\d+)', text)
keys = [extract_digits(substring) for substring in substrings]
return keysThe make_video function serves the purpose of generating a video from a sequence of image frames stored in a specified directory. Within the function, a cv2.VideoWriter object is initialized to write the frames into a video file. The codec used for video compression is specified as MJPG or Motion JPEG and the frame rate is set to 30 f/s.
This function iterates over all the sorted files from the image_folder and then writes them into a video. A progress bar will display the progress of the video creation. The video is released after finishing and all the OpenCV windows are closed. Finally, all image frames are removed from the image_folder cleaning up the directory.
def make_video(image_folder, video_name):
    images = [img for img in os.listdir(image_folder)]
    images.sort(key=natural_keys)

    frame = cv2.imread(os.path.join(image_folder, images[0]))
    height, width, layers = frame.shape

    fourcc = cv2.VideoWriter_fourcc(*"MJPG")

    video = cv2.VideoWriter(video_name, fourcc, 30.0, (width, height))
    bar = Bar('Creating Video', max=len(images))

    for image in images:
        video.write(cv2.imread(os.path.join(image_folder, image)))
        bar.next()

    cv2.destroyAllWindows()
    video.release()

    for file in os.listdir(image_folder):
os.remove(image_folder + file)Processing Video Frames for Motion Detection
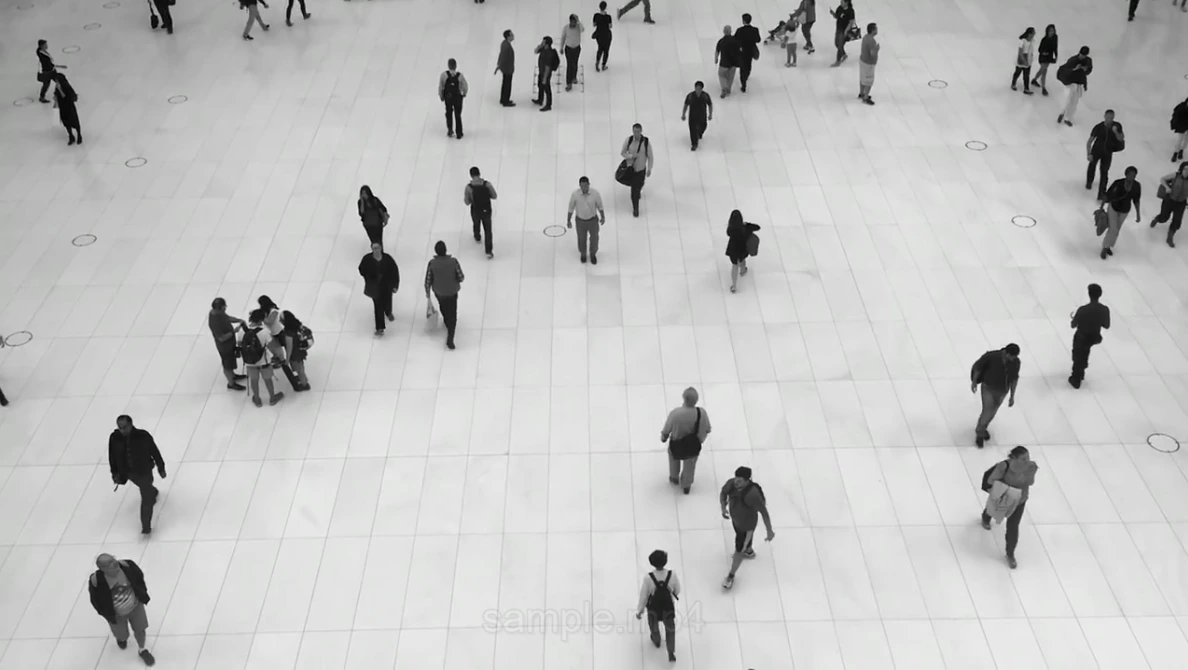
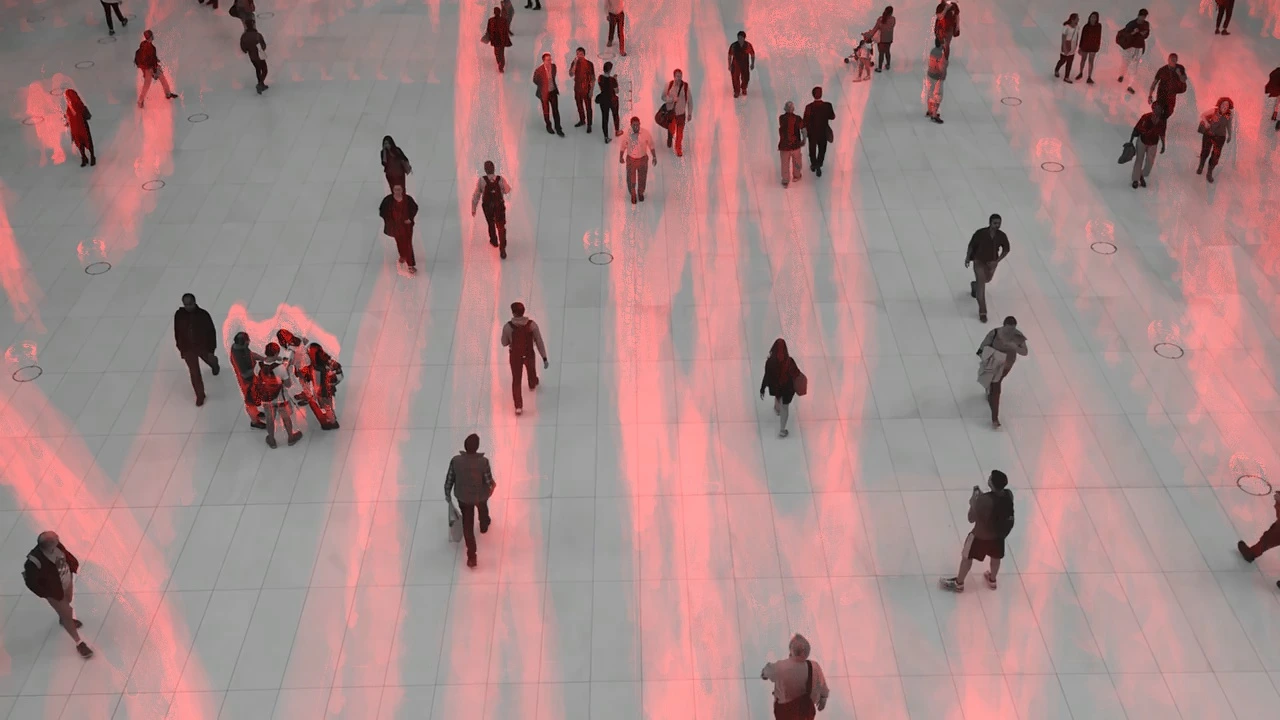
This is a frame from the input video :
In the main function, we'll utilize the previously defined functions on our input video. The cv2.VideoCapture object allows frame access. Using cv2.bgsegm.createBackgroundSubtractorMOG(), we create a background subtractor model.
capture = cv2.VideoCapture('/content/my_input_video.mp4')
background_subtractor = cv2.bgsegm.createBackgroundSubtractorMOG()
length = int(capture.get(cv2.CAP_PROP_FRAME_COUNT))

bar = Bar('Processing Frames', max=length)
Next, we'll process each video frame iteratively, applying background subtraction, accumulating motion, and saving processed frames with intermediate results. To accumulate motion, an empty image, 'accum_image', with the same dimensions as the frame is created (accum_image = np.zeros((height, width), np.uint8)). After the first frame, subsequent frames undergo background subtraction to detect motion."
# Initialize the first frame indicator
first_iteration_indicator = 1

# Loop through each frame in the video
for i in range(0, length):
    # Read the next frame from the video
    ret, frame = capture.read()
    if first_iteration_indicator == 1:
        # Store the first frame, its dimensions, and initialize the accumulation image
        first_frame = copy.deepcopy(frame)
        height, width = frame.shape[:2]
        accum_image = np.zeros((height, width), np.uint8)

        # Update the first iteration indicator
        first_iteration_indicator = 0
    else:
        # Apply background subtraction to remove the background
        filter = background_subtractor.apply(frame)

        # Save the current frame and background-subtracted frame
        cv2.imwrite('./image_result/frame.jpg', frame)
        cv2.imwrite('./image_result/diff-bkgnd-frame.jpg', filter)

        # Display the background-subtracted frame
        cv2.imshow('./image_result/diff-bkgnd-frame', filter)  # Show the diff-background

        # Display the current frame
        cv2.imshow('frame', frame)  # Show the current frame

        # Threshold the background-subtracted frame
        threshold = 1
        maxValue = 1
        ret, th1 = cv2.threshold(filter, threshold, maxValue, cv2.THRESH_BINARY)

        # Add the thresholded frame to the accumulated image
        accum_image = cv2.add(accum_image, th1)

        # Save the accumulated image
        cv2.imwrite('./image_result/mask.jpg', accum_image)

        # Display the accumulated image
        cv2.imshow('mask', accum_image)  # Show the current frame

        # Apply color mapping to the accumulated image
        color_image_video = cv2.applyColorMap(accum_image, cv2.COLORMAP_HOT)

        # Combine the current frame with the color-mapped accumulated image
        video_frame = cv2.addWeighted(frame, 0.7, color_image_video, 0.7, 0)

        # Save the processed frame
        name = "./frames/frame%d.jpg" % i
        cv2.imwrite(name, video_frame)

        # Check for 'q' key press to exit the loop
        if cv2.waitKey(1) & 0xFF == ord('q'):
            break

    # Increment the progress bar
    bar.next()

# Finish the progress bar
bar.finish()
Generating the heatmap
The code finalizes the motion heatmap generation process by creating a video, overlaying the heatmap on the first frame, saving the heatmap image, and performing cleanup operations.
 make_video('./frames/', './output.avi')

    color_image = cv2.applyColorMap(accum_image, cv2.COLORMAP_HOT)
    result_overlay = cv2.addWeighted(first_frame, 0.7, color_image, 0.7, 0)

    # save the final heatmap
    cv2.imwrite('diff-overlay.jpg', result_overlay)

    # cleanup
    capture.release()
    cv2.destroyAllWindows()
Generated Images
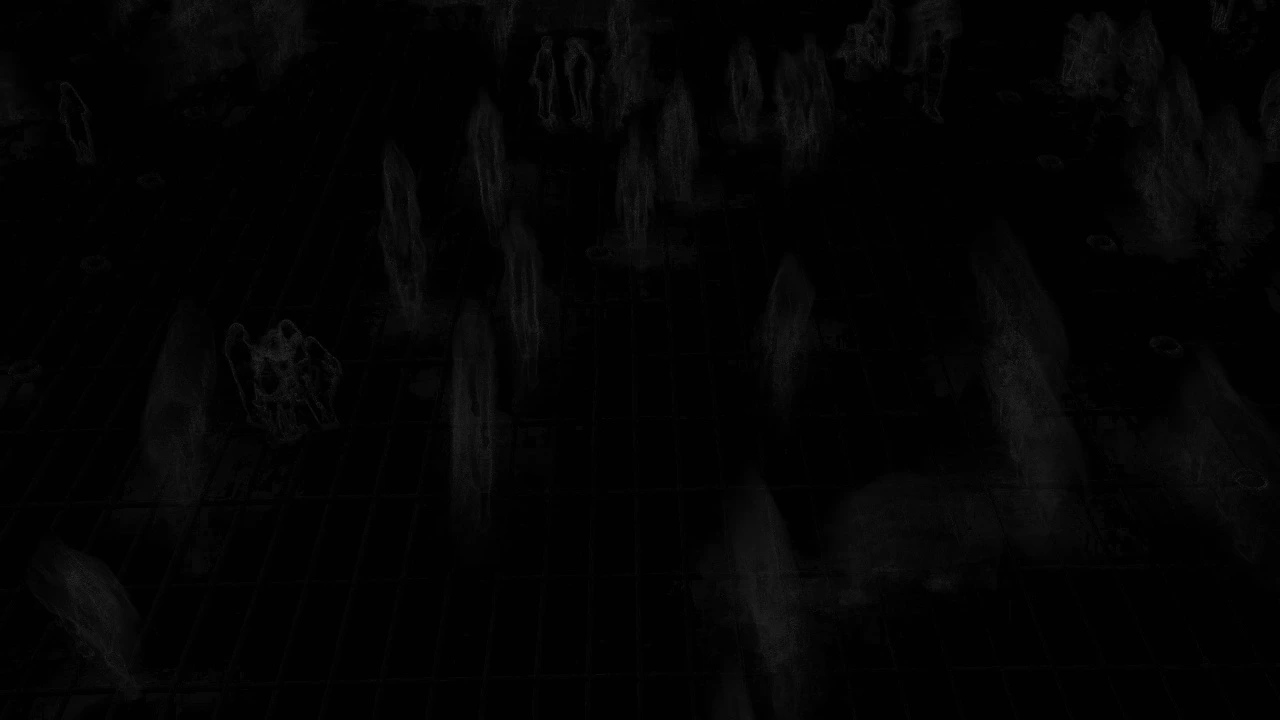
diff-bkgnd-frame.jpg: It helps in highlighting the regions where motion is detected in the video.
frame.jpg: This file is a snapshot of the current frame being processed. It is saved for debugging purposes and may not be directly used in the final output.
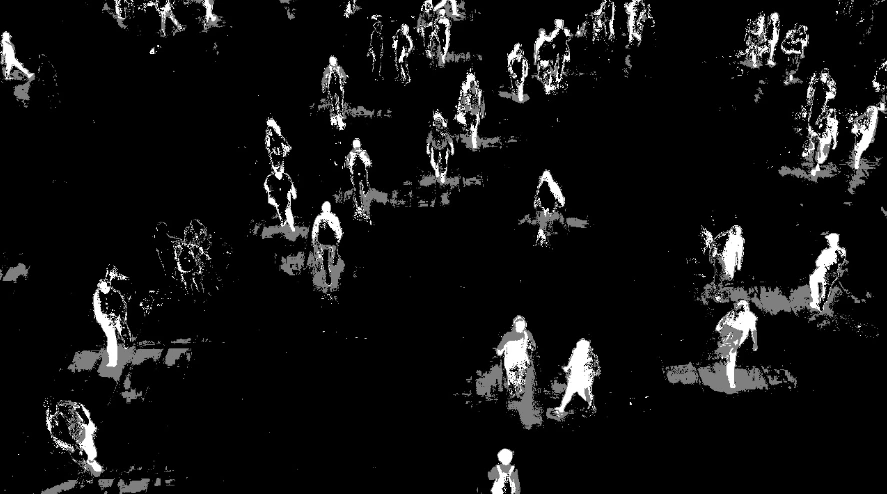
mask.jpg: This file contains the binary mask obtained after thresholding the background-subtracted image. The mask highlights the regions of significant motion detected in the current frame.
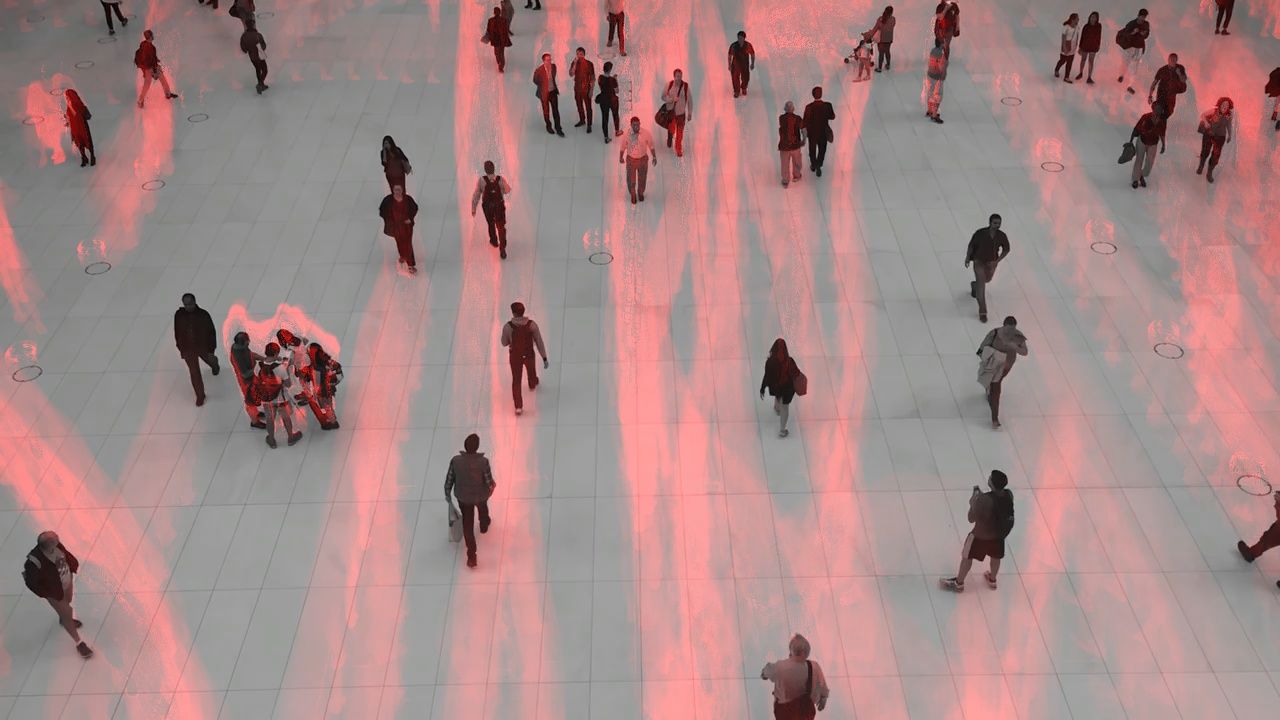
diff-overlay.jpg: This file is the final output, which represents the overlay of the motion heatmap on the first frame of the input video. It visually indicates the areas where motion occurred throughout the video.
output.avi: The final output video.
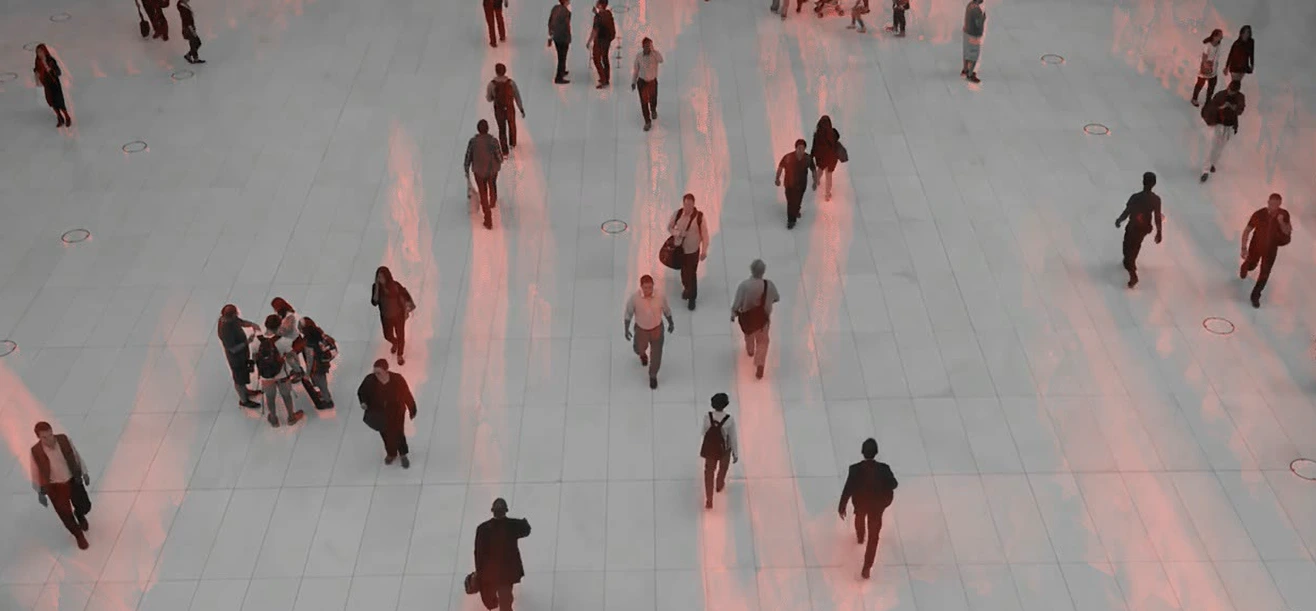
This image is an example frame form the output video.
Conclusion
By following the steps outlined here, you can harness the power of computer vision to detect and visualize motion patterns in video data. From security surveillance to sports analytics, motion heatmaps offer valuable insights into dynamic environments, enabling better decision-making and understanding of complex scenarios.
Frequently Asked Questions
What is the purpose of a heatmap?
A heatmap visually represents data using colors to show the intensity of values across a grid. It's used to identify patterns, correlations, and trends within large datasets, making complex information easier to understand and analyze.
What is heat map with example?
An example of a heatmap could be tracking website user interactions. Areas with more clicks or activity would appear in warmer colors like red, indicating high engagement, while cooler colors like blue would represent areas with less interaction.
What is the use of heatmap in machine learning?
In machine learning, heatmaps are utilized for various tasks such as analyzing feature importance, visualizing activation patterns in neural networks, and understanding spatial distributions in data like object detection or segmentation outputs.
How do you create a heat map?
To create a heatmap, first, gather the data to be visualized. Then, choose a suitable visualization library like Matplotlib or Seaborn in Python. Use functions specific to these libraries to plot the data on a grid, assigning colors corresponding to the intensity of values.
Looking for high quality training data to train your motion heatmap model? Talk to our team to get a tool demo.
Book our demo with one of our product specialist
Book a Demo