

ML Beginner's Guide To Self-Checkout Model

Introduction
A retail product checkout refers to the process of finalizing a purchase transaction at a retail store.
It involves scanning or manually entering items, calculating the total cost, processing payment, and providing a receipt to the customer.
The retail product checkout system refers to the system or framework used to automate and optimize the checkout process in retail stores.
It encompasses various technologies, such as barcode scanning, object recognition, and machine learning algorithms, to accurately identify and tally purchased items, calculate the total cost, and facilitate payment processing.
These models streamline the purchasing process, enhancing efficiency and accuracy. By automating checkout procedures, businesses reduce waiting times and improve customer satisfaction.
This blog post provides a comprehensive guide to creating a computer vision model utilizing YOLO_NAS.
Prerequisites
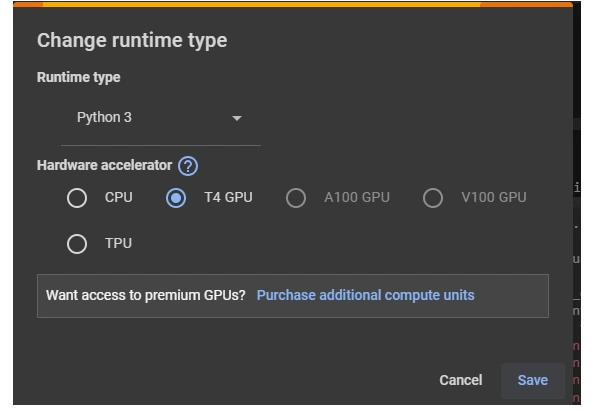
For this model I will be using Google Collab. Change your runtime settings to T4 GPU from the settings.
To make sure you can use all the necessary tools and libraries for your project, you'll want to install them first. This step ensures that your environment has access to everything it needs to run the code smoothly.
%%capture
!pip install super_gradients
!pip install imutils
!pip install roboflow
!pip install pytube --upgrade
The "super_gradients" library is used for computing gradients in your computer vision project and the imutils module provides a collection of convenience functions for basic image processing tasks. Roboflow toolkit is for working with datasets in machine learning tasks.
These lines import components for training a computer vision model: Trainer, data loaders, COCO data loaders, clear_output, loss function, metrics, and post-prediction callback.
from super_gradients.training import Trainer
from super_gradients.training import dataloaders
from super_gradients.training.dataloaders.dataloaders import coco_detection_yolo_format_train, coco_detection_yolo_format_val

from IPython.display import clear_output
from super_gradients.training.losses import PPYoloELoss
from super_gradients.training.metrics import DetectionMetrics_050

from super_gradients.training.models.detection_models.pp_yolo_e import PPYoloEPostPredictionCallback

from super_gradients.training import models
Initializing a Trainer object with specific parameters allows us to manage and organize our training process effectively. This setup enables easy tracking of training progress and facilitates reproducibility of experiments.
PROJECT_DIR = 'retail_checkout_model'
trainer = Trainer(experiment_name='retail_obj_detection', ckpt_root_dir=PROJECT_DIR)
Importing the dataset
Go to the dataset page on Roboflow: Shopping Items
Click on "YOLOv5" under "Downloaded Formats" to generate a special download code.
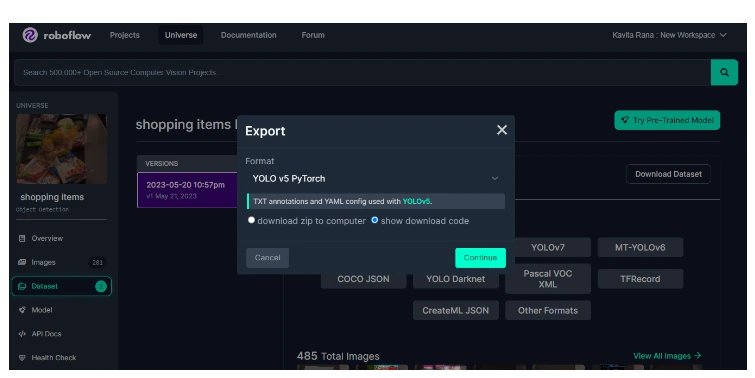
Copy the snippet provided on the Roboflow website.
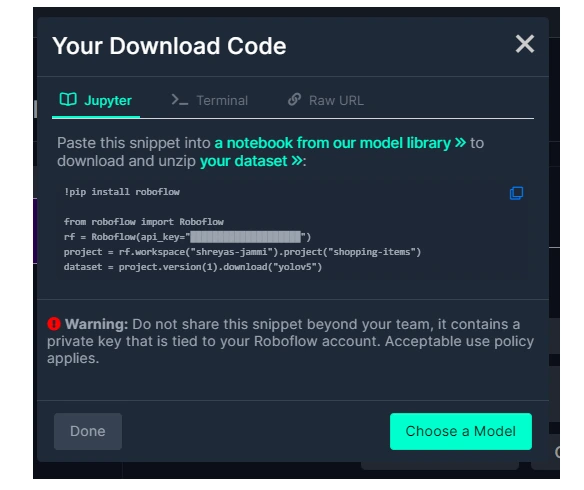
Paste the snippet into a code cell in your Google Collab notebook.
Run the code cell to import the dataset into your environment.
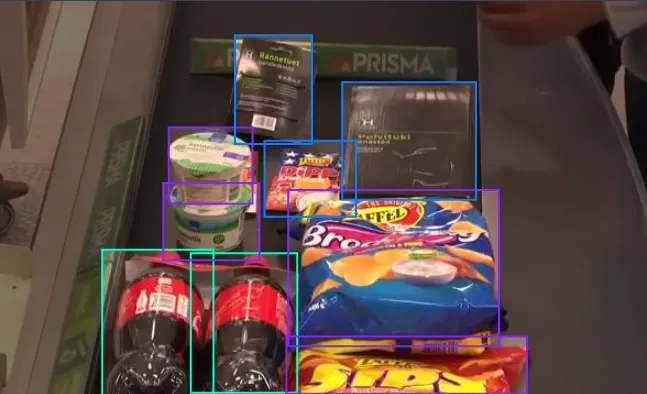
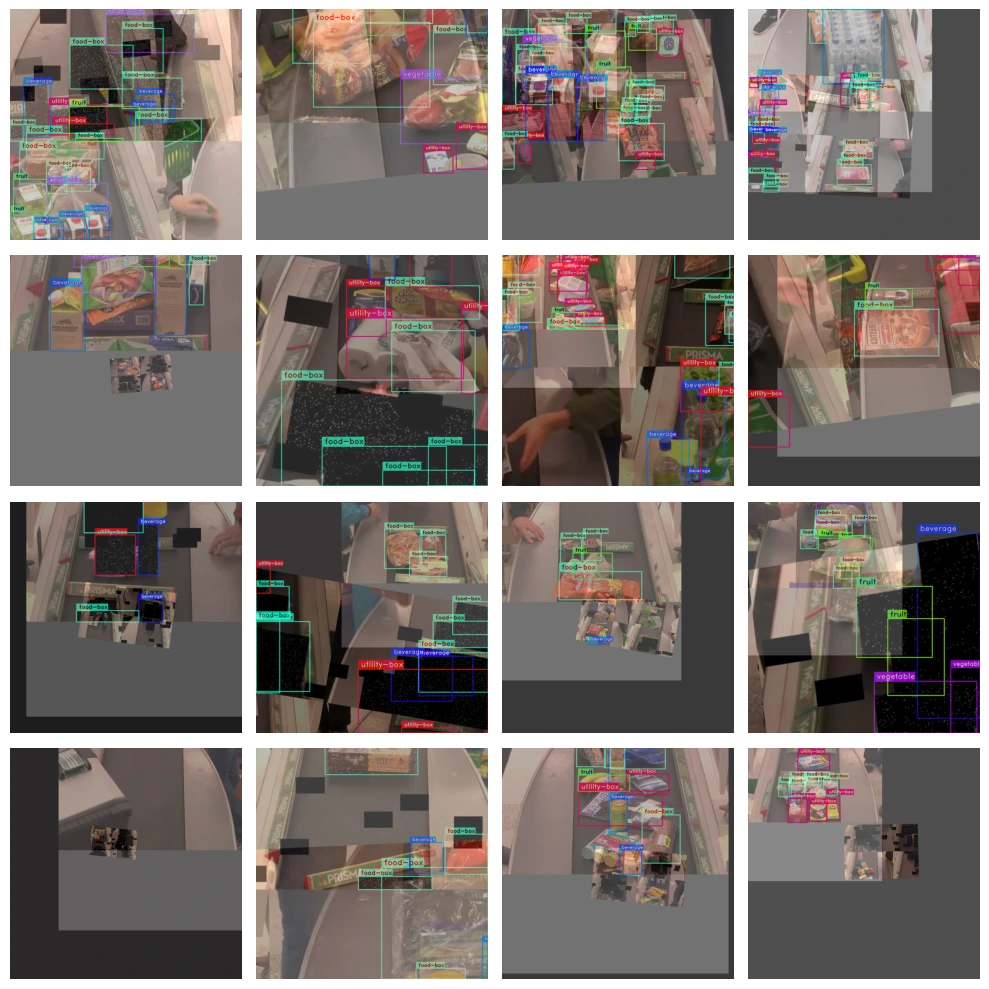
The dataset is split into three sets: Train, Valid, and Test, comprising 88%, 8%, and 4% of the data, respectively. No preprocessing was applied, but augmentations include flipping horizontally and vertically, cropping, cutout, and adding noise to bounding boxes. Each training example has three outputs.
The annotated images are displayed below.
The `data.yaml' file helps organize and standardize the dataset's metadata, making it easier to load, process, and analyze the data within the project environment.
with open('/content/shopping-items-1/data.yaml', 'r') as file:
    data = file.read()
    print(data)
Categories: Beverage, Food Box, Fruit, Utility Box, Vegetable and Number of Classes: 5
This step organizes the dataset structure and provides essential information for loading and processing data during training, validation, and testing phases.
dataset_params = {
    'data_dir':'/content/shopping-items-1',
    'train_images_dir':'train/images',
    'train_labels_dir':'train/labels',
    'val_images_dir':'valid/images',
    'val_labels_dir':'valid/labels',
    'test_images_dir':'test/images',
    'test_labels_dir':'test/labels',
    'classes': ['beverage','food-box','fruit','utility-box','vegetable']
}
Preprocessing Data
Creating data loaders for training, validation, and testing datasets in COCO YOLO format. Data loaders facilitate efficient loading and preprocessing of dataset images and labels during training, validation, and testing phases, enabling seamless integration with the model training pipeline.
Setting appropriate batch size and number of workers optimizes data loading performance, balancing between memory utilization and processing speed, leading to efficient training and evaluation of the model.
train_data = coco_detection_yolo_format_train(
    dataset_params={
        'data_dir': dataset_params['data_dir'],
        'images_dir': dataset_params['train_images_dir'],
        'labels_dir': dataset_params['train_labels_dir'],
        'classes': dataset_params['classes']
    },
    dataloader_params={
        'batch_size': 8,
        'num_workers': 2
    }
)
val_data = coco_detection_yolo_format_val(
    dataset_params={
        'data_dir': dataset_params['data_dir'],
        'images_dir': dataset_params['val_images_dir'],
        'labels_dir': dataset_params['val_labels_dir'],
        'classes': dataset_params['classes']
    },
    dataloader_params={
        'batch_size':8,
        'num_workers':2
    }
)

test_data = coco_detection_yolo_format_val(
    dataset_params={
        'data_dir': dataset_params['data_dir'],
        'images_dir': dataset_params['test_images_dir'],
        'labels_dir': dataset_params['test_labels_dir'],
        'classes': dataset_params['classes']
    },
    dataloader_params={
        'batch_size':8,
        'num_workers':2
    }
)

clear_output()
The code accesses the transformations applied to the training dataset.
train_data.dataset.transformstrain_data.dataset.dataset_params['transforms'][1]train_data.dataset.dataset_params['transforms'][1]['DetectionRandomAffine']['degrees'] = 10.42This sets the degree parameter for the DetectionRandomAffine transformation to 10.42 degrees in the training dataset.
train_data.dataset.plot()
Model Building
YOLO_NAS
YOLO_NAS stands for "You Only Look Once Neural Architecture Search." It's a variant of the YOLO (You Only Look Once) object detection model that utilizes neural architecture search (NAS) techniques to automatically design the architecture of the model for a given task.
The NAS approach allows the model architecture to be tailored specifically to the task at hand, resulting in optimized performance for object detection in retail environments.
Initializing the model with the specified architecture and number of output classes prepares it for training on the provided dataset.
Additionally, loading pretrained weights from the COCO dataset initializes the model with learned features, aiding in convergence during training.
Code
model = models.get('yolo_nas_s',
                   num_classes=len(dataset_params['classes']),
                   pretrained_weights="coco"
                   )
Properly configuring training parameters ensures effective model training by specifying settings such as learning rate schedule, optimizer, loss function, and evaluation metrics.
Warm-up helps stabilize training at the beginning, EMA improves model performance by smoothing updates, and mixed precision training utilizes lower precision arithmetic for faster training without sacrificing accuracy.
train_params = {
    # Silent Mode
    'silent_mode': True,

    # Average Best Models
    "average_best_models": True,

    # Warmup Settings
    "warmup_mode": "linear_epoch_step",
    "warmup_initial_lr": 1e-6,
    "lr_warmup_epochs": 3,

    # Learning Rate
    "initial_lr": 5e-4,
    "lr_mode": "cosine",
    "cosine_final_lr_ratio": 0.1,

    # Optimizer
    "optimizer": "Adam",
    "optimizer_params": {"weight_decay": 0.0001},
    "zero_weight_decay_on_bias_and_bn": True,

    # Exponential Moving Average (EMA)
    "ema": True,
    "ema_params": {"decay": 0.9, "decay_type": "threshold"},

    # Training Epochs
    "max_epochs": 15,

    # Mixed Precision
    "mixed_precision": True,

    # Loss Function
    "loss": PPYoloELoss(
        use_static_assigner=False,
        num_classes=len(dataset_params['classes']),
        reg_max=16
    ),

    # Validation Metrics
    "valid_metrics_list": [
        DetectionMetrics_050(
            score_thres=0.1,
            top_k_predictions=300,
            num_cls=len(dataset_params['classes']),
            normalize_targets=True,
            post_prediction_callback=PPYoloEPostPredictionCallback(
                score_threshold=0.01,
                nms_top_k=1000,
                max_predictions=300,
                nms_threshold=0.7
            )
        )
    ],

    # Metric to Monitor
    "metric_to_watch": 'mAP@0.50'
}
Training and Testing
This step starts the model training process, where the model learns from the training data to optimize its parameters.
The validation dataset is used to evaluate the model's performance during training and monitor for overfitting or underfitting.
trainer.train(model=model,
              training_params=train_params,
              train_loader=train_data,
              valid_loader=val_data)
Accessing the best model checkpoint allows for deployment or further evaluation of the model that achieved the highest performance during training, ensuring optimal utilization of trained models.
best_model = models.get(
'yolo_nas_s',
num_classes=len(dataset_params['classes']),
checkpoint_path=(
"retail_checkout_model/"
"retail_obj_detection/"
"RUN_20240219_135839_446832/"
"ckpt_best.pth"
)
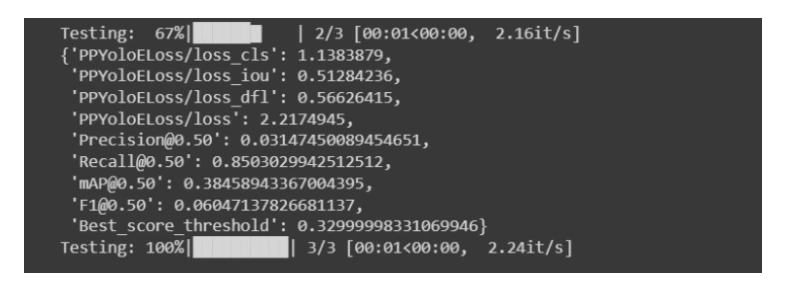
)Evaluating the best model's performance on the test dataset.
The metrics are as follows:
- DetectionMetrics_050: This is a class representing the evaluation metrics for object detection. The "050" indicates that it evaluates detection performance at a confidence threshold of 0.5.
- score_thres: This parameter sets the confidence threshold for considering a detection as valid. Any detection with a confidence score above this threshold is considered a valid detection.
- top_k_predictions: It specifies the maximum number of predictions to consider for evaluation. If there are more predictions than this value, the top-k predictions with the highest confidence scores are considered.
- num_cls: This parameter indicates the number of classes (categories) in the dataset. In this case, it is set to 5, suggesting that the dataset contains 5 different classes of objects.
- normalize_targets: When set to True, it normalizes the target coordinates of bounding boxes during evaluation. This ensures consistency in the evaluation process.
- post_prediction_callback: This callback function is applied after the predictions are made by the model. It applies post-processing techniques such as non-maximum suppression (NMS) to refine the predictions and improve their accuracy.
trainer.test(
    model=best_model,
    test_loader=test_data,
    test_metrics_list=DetectionMetrics_050(
        score_thres=0.1,
        top_k_predictions=300,
        num_cls=5,
        normalize_targets=True,
        post_prediction_callback=PPYoloEPostPredictionCallback(
            score_threshold=0.01,
            nms_top_k=1000,
            max_predictions=300,
            nms_threshold=0.7
        )
    )
)
Displaying Images
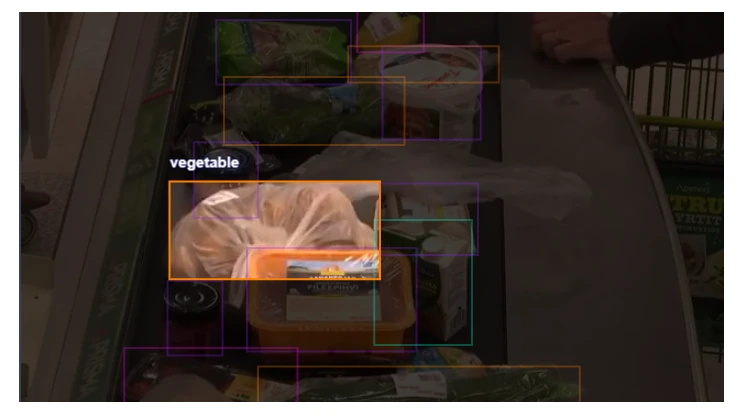
Testing our model on an image from a validation set.
img_url = '/content/shopping-items-1/valid/images/youtube-138_jpg.rf.7438a79a8815c4c38a10e1d0465facac.jpg'
best_model.predict(img_url).show()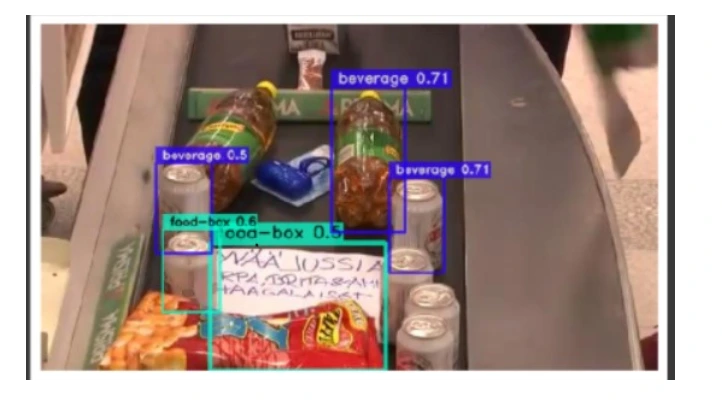
Displaying Video
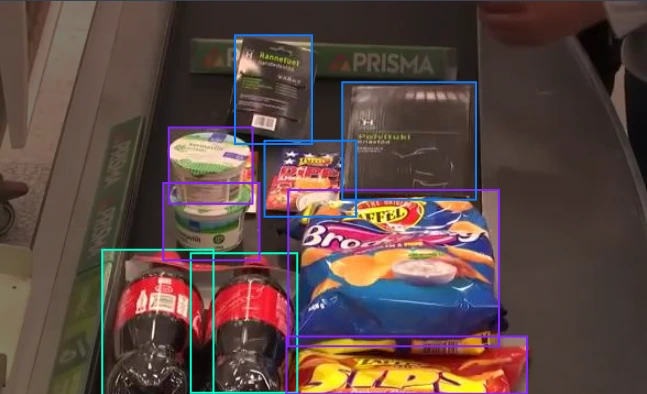
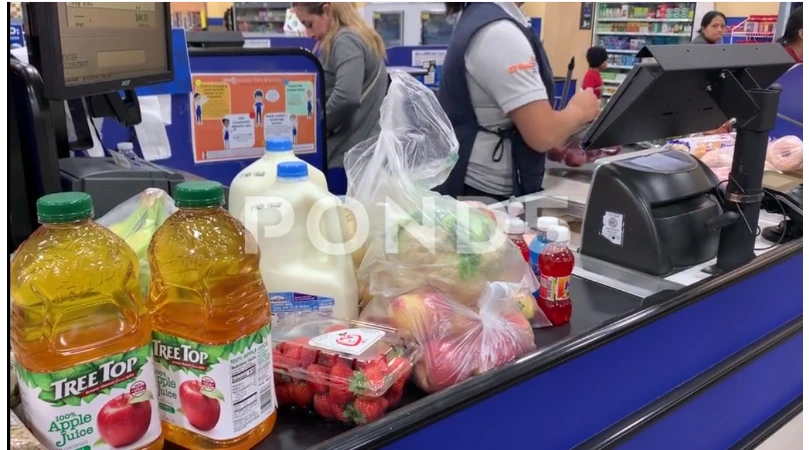
Here are some sample frame from the input video:
This code snippet is using the best_model to make predictions on the input video file specified by input_video_path. It then saves the processed video, which includes the model's predictions, to the file path specified by output_video_path.
Additionally, it ensures that the model is moved to the appropriate device (either GPU or CPU) specified by the device variable before making predictions.
input_video_path = f"/content/video_input3.mp4"
output_video_path = "/content/output_video3.mp4"
import torch
device = 'cuda' if torch.cuda.is_available() else "cpu"best_model.to(device).predict(input_video_path).save(output_video_path)This displays the video in the google collab environment.
from IPython.display import HTML
from base64 import b64encode
import os

# Define paths
save_path = '/content/output_video3.mp4'
compressed_path = "/content/result_compressed.mp4"

# Compress video using ffmpeg
os.system(f"ffmpeg -i {save_path} -vcodec libx264 {compressed_path}")

# Read compressed video file
mp4 = open(compressed_path, 'rb').read()

# Convert video to base64 for displaying
data_url = "data:video/mp4;base64," + b64encode(mp4).decode()

# Display compressed video
HTML("""
<video width=400 controls>
      <source src="%s" type="video/mp4">
</video>
""" % data_url)
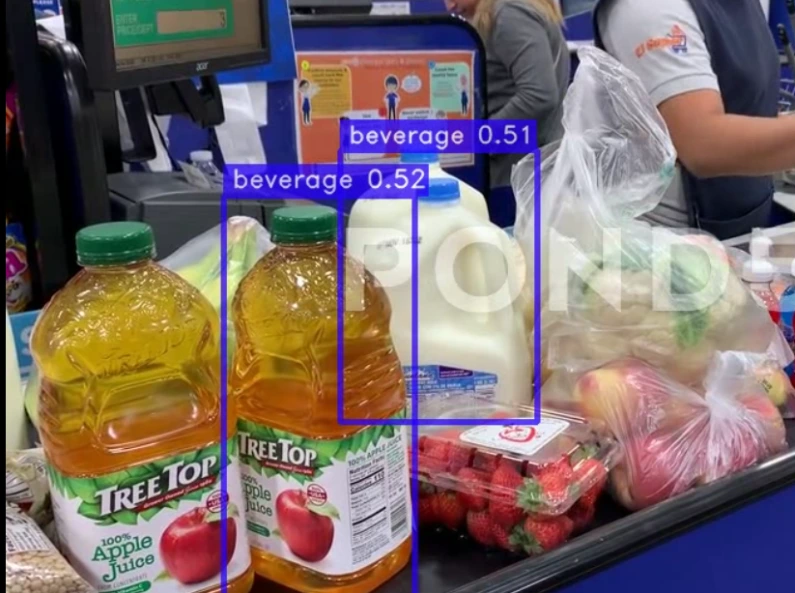
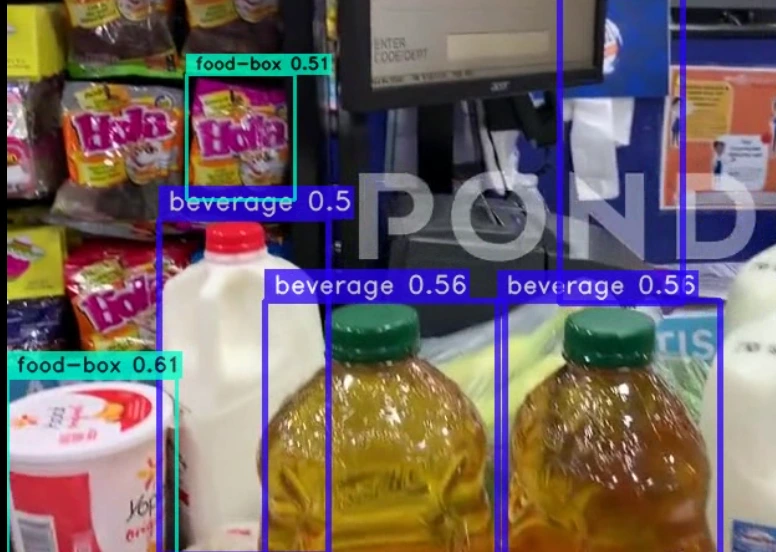
Our model is working great in categorizing the products in a video stream as well.
Deployment and Integration
- Collecting Images and Annotating : Collect images and annotate them with categories. Utilize tools like Labellerr for efficient annotation of these images, aiding in the creation of annotated datasets for training computer vision models.
- Hardware Setup: Install cameras at strategic locations throughout the store to capture images of products at checkout counters.
- Integration with Point-of-Sale (POS) Systems: Integrate the object detection system with existing POS systems to seamlessly incorporate product recognition into the checkout process. This integration ensures that scanned items are correctly identified and added to the customer's bill.
- Network Infrastructure: Ensure robust network connectivity to transmit images from cameras to the object detection system and exchange data with the POS system in real-time.
- Deployment Architecture: Design a deployment architecture that accommodates the computational requirements of the object detection model while maintaining responsiveness at the checkout counter.
- Testing and Calibration: Conduct thorough testing and calibration to optimize the performance of the object detection system in the specific in-store environment. This may involve adjusting camera angles, lighting conditions, and model parameters.
Conclusion
In conclusion, building a retail product checkout model using computer vision technology offers numerous benefits for businesses.
By accurately recognizing and tracking items during checkout, retailers can enhance efficiency, reduce errors, and improve customer experience.
With the right tools and techniques, deploying such a system in real-world scenarios, like grocery stores, can significantly streamline operations and drive success.
Frequently Asked Questions
How is computer vision used in retail industry?
Computer vision aids retail by automating tasks like inventory management and customer tracking. It enhances customer experiences through personalized recommendations and cashier-less checkout systems.
What is computer vision powered checkout?
Computer vision-powered checkout employs cameras and algorithms to scan and identify products, enabling seamless and efficient cashier-less transactions.
Looking for high quality training data to train your self-checkout model? Talk to our team to get a tool demo.
Book our demo with one of our product specialist
Book a Demo