

How to Fine-Tune the SAM Model with Your Own Dataset
Fine-tuning Segment Anything (SAM) improves its accuracy for specific domains like medical imaging, agriculture, and surveillance. While SAM performs well out of the box, customizing it helps capture finer details.

With over 11 million images and 1.1 billion masks, Meta's Segment Anything Model (SAM) is reshaping computer vision.
Using prompt-based segmentation, using points, boxes, or even text, delivers real-time results in just 50ms per image.
As industries embrace AI-driven annotation, robotics, and medical imaging, SAM stands out as a game-changer in interactive segmentation.
However, in many practical use cases, the mask generated is not very accurate, which can be solved using fine-tuning.
But how can one do it? Let’s explore.
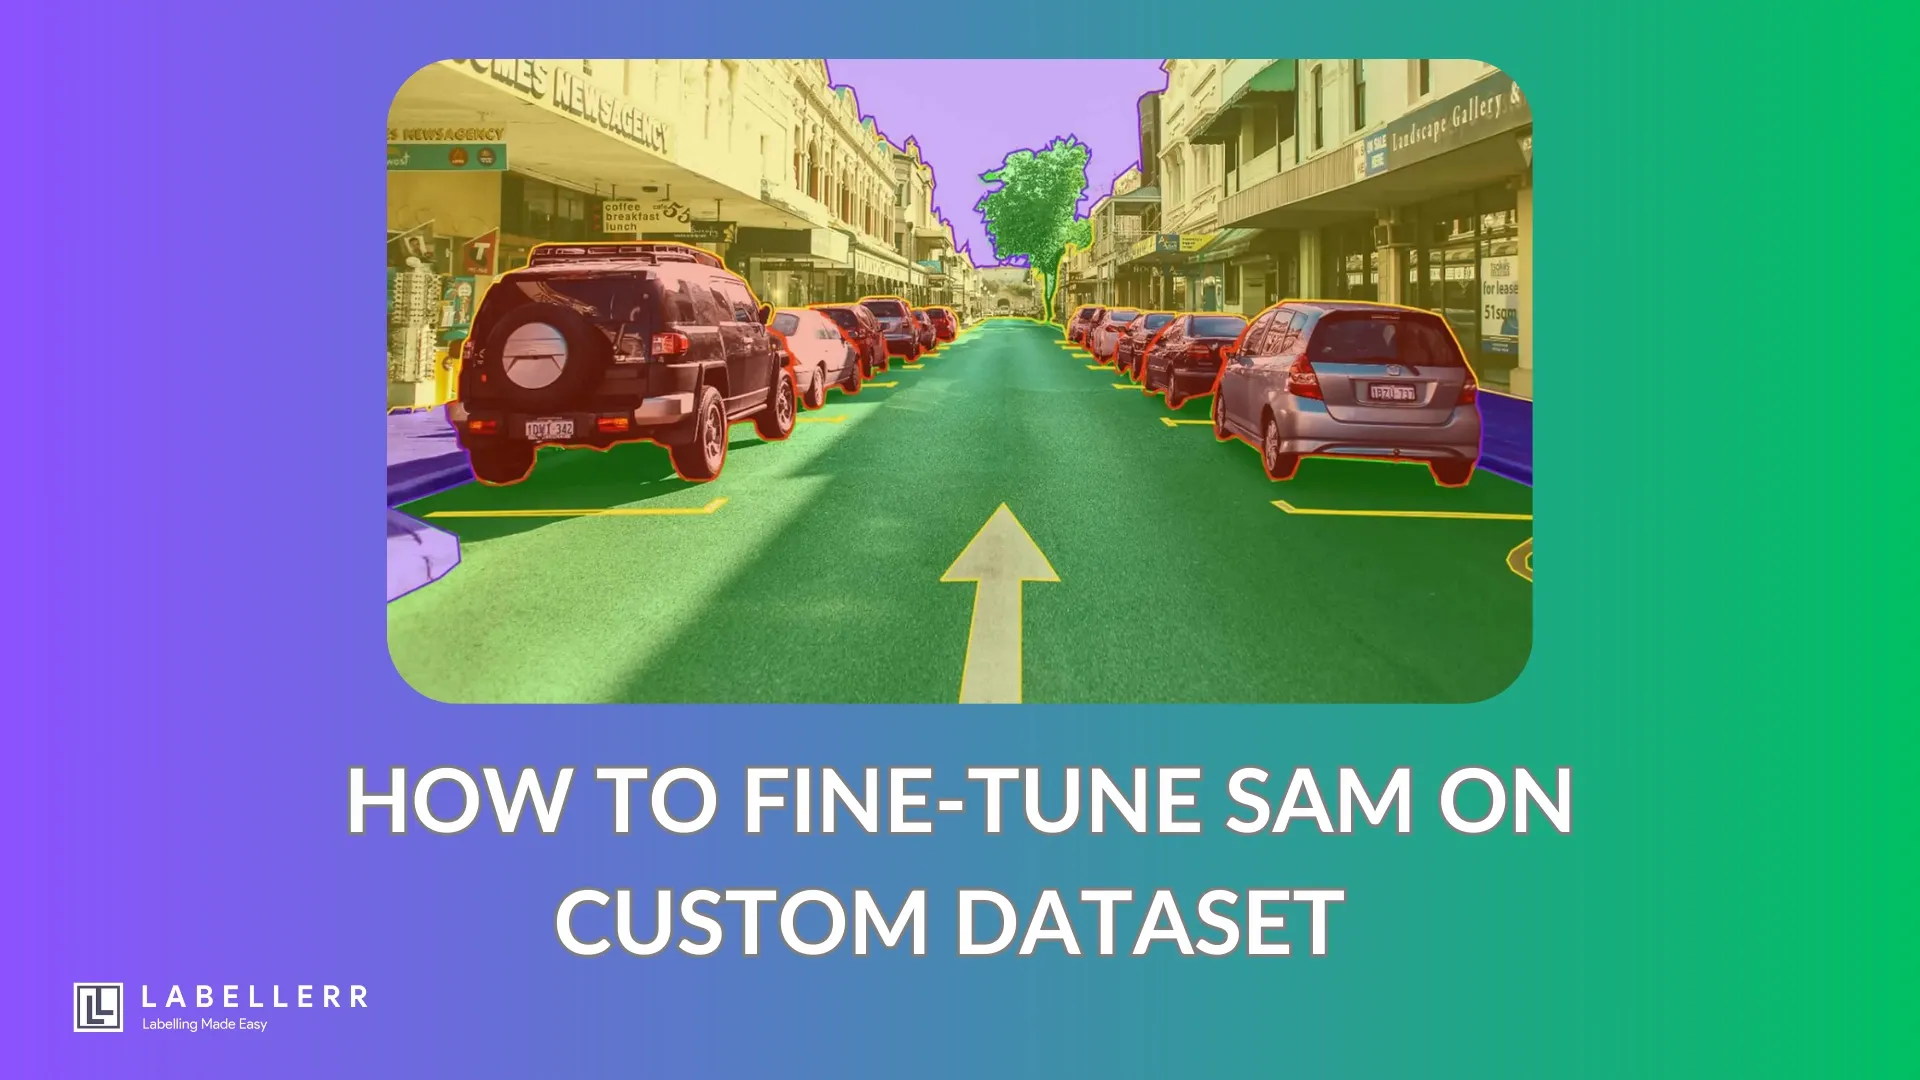
What is Segmentation?
Segmentation is the process of dividing an image into different parts to identify objects. It helps computers understand what is in a picture by separating objects from the background.
For example, if you have a photo of a cat on a couch, segmentation allows an AI model to outline the cat separately from the couch.
In short, segmentation helps AI see and understand images like humans do by breaking them into meaningful sections.

Why Segmentation is Needed?
Segmentation is needed because it helps computers see and understand images better by separating objects from the background.
This makes it easier for vision models to detect, recognize, and analyze objects with high precision.
For example:
- In self-driving cars, segmentation helps identify roads, pedestrians, and vehicles more accurately than simple bounding boxes, which may include extra background noise.
- In medical imaging, it highlights tumors or organs for doctors to examine, unlike bounding boxes that only give a rough estimate of their location.
- In photo editing, it allows users to remove backgrounds or change specific parts of an image without selecting unnecessary areas.
Cons of Bounding Boxes
Bounding boxes, while useful, lack precision because they only draw rectangles around objects.
This means they can include unwanted background pixels and fail to capture complex shapes.
Segmentation solves this by providing pixel-perfect outlines, improving accuracy in tasks like object detection, facial recognition, and robotics.
Segment Anything Model
Meta developed the Segment Anything Model (SAM) to perform precise object segmentation in images.
It quickly detects and isolates objects using simple user inputs like clicks, boxes, or text prompts. SAM works without retraining, allowing it to segment new objects effortlessly.
Overview of the Working Of SAM
It first analyzes the image, then understands user inputs, and finally creates a precise mask around the object.
- SAM analyzes the image using a special AI model called an image encoder. This encoder turns the image into a compact digital format, making it easier to process.
- SAM understands user prompts through a prompt encoder. Users can click on an object, draw a box, or even use text to tell SAM what to segment. The model then translates these inputs into data it can use.
- SAM generates a mask with the help of a mask decoder. It combines the image and user prompts to create an accurate outline of the object in just 50 milliseconds.
How to use SAM
Install the important modules
!pip install opencv-python matplotlib torch torchvisionImport Necessary Libraries
import torch
import torchvision
import numpy as np
import torch
import matplotlib.pyplot as plt
import cv2
Download important weights for SAM
!wget https://dl.fbaipublicfiles.com/segment_anything/sam_vit_h_4b8939.pthDefine Helper function
These functions are used to visualize masks, points, and bounding boxes.
def show_mask(mask, ax, random_color=False):
    if random_color:
        color = np.concatenate([np.random.random(3), np.array([0.6])], axis=0)
    else:
        color = np.array([30/255, 144/255, 255/255, 0.6])
    h, w = mask.shape[-2:]
    mask_image = mask.reshape(h, w, 1) * color.reshape(1, 1, -1)
    ax.imshow(mask_image)
def show_points(coords, labels, ax, marker_size=375):
    pos_points = coords[labels==1]
    neg_points = coords[labels==0]
    ax.scatter(pos_points[:, 0], pos_points[:, 1], color='green', marker='*', s=marker_size, edgecolor='white', linewidth=1.25)
    ax.scatter(neg_points[:, 0], neg_points[:, 1], color='red', marker='*', s=marker_size, edgecolor='white', linewidth=1.25)
def show_box(box, ax):
    x0, y0 = box[0], box[1]
    w, h = box[2] - box[0], box[3] - box[1]
    ax.add_patch(plt.Rectangle((x0, y0), w, h, edgecolor='green', facecolor=(0,0,0,0), lw=2))
Load an Example Image
Load an image for testing.
image = cv2.imread('images/truck.jpg')
image = cv2.cvtColor(image, cv2.COLOR_BGR2RGB)

Initialize SAM Predictor
Set up the SAM model and load pre-trained weights.
from segment_anything import SamPredictor

model_path = "sam_vit_h_4b8939.pth"
sam_predictor = SamPredictor(model_path)
Generate Image Embeddings
Set the image in the predictor to compute embeddings.
sam_predictor.set_image(image)
Provide Prompts and Predict Masks
You can use points or bounding boxes as prompts to predict masks.
- Example with point prompts:
point_coords = np.array([[500, 375]])  # Example coordinates
point_labels = np.array([1])          # Label (1 for foreground)

# predicting using points as input
masks = sam_predictor.predict(point_coords=point_coords, point_labels=point_labels)

- Example with box prompts:
box_coords = np.array([[300, 200], [600, 400]])  # Example bounding box coordinates

# predicting using box as imput
masks = sam_predictor.predict(box_coords=box_coords)

Visualize Results
Use helper functions to display masks and prompts on the image.
fig, ax = plt.subplots(1, figsize=(10, 10))
ax.imshow(image)
show_mask(masks[0], ax)  # Display the first mask
show_points(point_coords, point_labels, ax)  # Display points (if used)
plt.axis('off')
plt.show()


For reference, use the following Notebook
Create precise datasets for medical, agriculture, or robotics projects. Get accurate segmentation masks and boost your AI results. Book a Demo
How to Fine-tune SAM using a Custom Dataset
As we can see in the previous section, the out-of-box model performs well in segmentation but misses some edges of the target object.
That is the reason many domain experts fine-tune SAM according to their field of use, like medical, agriculture, monitoring, etc
In this section, we will fine-tune SAM according to our needs.
Prerequisites
# Python 3.8+

# PyTorch 2.0+

# torchvision, numpy, opencv-python

# segment-anything repository from Meta

# GPU with sufficient VRAM (A100, RTX 3090, or better)
Environment Setup
Create a virtual environment and install dependencies:
python -m venv sam_env
source sam_env/bin/activate  # On Windows use: sam_env\Scripts\activate
pip install torch torchvision numpy opencv-python
pip install git+https://github.com/facebookresearch/segment-anything.git
Load Pretrained SAM Model
SAM provides three variants: ViT-H, ViT-L, and ViT-B. Choose the best model for your task.
from segment_anything import sam_model_registry

sam_checkpoint = "path/to/sam_vit_h.pth"  # Update path accordingly
sam = sam_model_registry["vit_h"](checkpoint=sam_checkpoint)
sam.to("cuda")
Prepare Custom Dataset
SAM expects images with corresponding masks. Ensure your dataset follows this structure:
/custom_dataset/
    images/
        img1.jpg
        img2.jpg
    masks/
        img1.png
        img2.png
Each mask should be a binary or multi-class segmentation mask.
Data Preprocessing
import os
import cv2
import torch
from torch.utils.data import Dataset, DataLoader

class CustomSAMDataset(Dataset):
    def __init__(self, image_dir, mask_dir, transform=None):
        self.image_dir = image_dir
        self.mask_dir = mask_dir
        self.images = os.listdir(image_dir)
        self.transform = transform

    def __len__(self):
        return len(self.images)

    def __getitem__(self, idx):
        img_path = os.path.join(self.image_dir, self.images[idx])
        mask_path = os.path.join(self.mask_dir, self.images[idx].replace('.jpg', '.png'))

        image = cv2.imread(img_path)
        image = cv2.cvtColor(image, cv2.COLOR_BGR2RGB)
        mask = cv2.imread(mask_path, cv2.IMREAD_GRAYSCALE)

        if self.transform:
            image = self.transform(image)
            mask = torch.tensor(mask, dtype=torch.long)

        return image, mask
Define Training Loop
import torch.optim as optim
from torch.nn import CrossEntropyLoss

def train_sam(model, dataloader, epochs=10, lr=1e-4):
    model.train()
    optimizer = optim.AdamW(model.parameters(), lr=lr)
    criterion = CrossEntropyLoss()

    for epoch in range(epochs):
        total_loss = 0
        for images, masks in dataloader:
            images, masks = images.to("cuda"), masks.to("cuda")
            optimizer.zero_grad()
            outputs = model(images)
            loss = criterion(outputs, masks)
            loss.backward()
            optimizer.step()
            total_loss += loss.item()
        print(f"Epoch {epoch+1}/{epochs}, Loss: {total_loss/len(dataloader)}")
Fine-Tune and Save the Model
dataset = CustomSAMDataset("custom_dataset/images", "custom_dataset/masks")
dataloader = DataLoader(dataset, batch_size=8, shuffle=True)
train_sam(sam, dataloader, epochs=20, lr=5e-5)

# Save fine-tuned model
torch.save(sam.state_dict(), "fine_tuned_sam.pth")
Inference on New Images
def segment_image(model, image_path):
    image = cv2.imread(image_path)
    image = cv2.cvtColor(image, cv2.COLOR_BGR2RGB)
    image = torch.tensor(image).permute(2, 0, 1).unsqueeze(0).float().to("cuda")

    model.eval()
    with torch.no_grad():
        output = model(image)

    mask = torch.argmax(output, dim=1).cpu().numpy()[0]
    return mask


For reference, use the following Notebook-1 and Notebook-2
Conclusion
SAM works well out of the box for segmentation, but it sometimes misses fine details, especially around object edges.
That’s why many experts fine-tune SAM for specific fields like medical imaging, agriculture, and surveillance.
By training SAM on custom datasets, researchers and engineers improve its accuracy for their unique needs.
Fine-tuning helps SAM detect objects more precisely, making it more reliable for real-world applications.
With the right adjustments, SAM becomes even more powerful, offering better segmentation results across different industries.
FAQ
Why should I fine-tune SAM on a custom dataset?
SAM works well out of the box but may miss fine details in specific domains like medical imaging, agriculture, or surveillance. Fine-tuning improves its accuracy for specialized tasks.
What kind of dataset do I need for fine-tuning SAM?
You need a domain-specific dataset with high-quality annotations, including segmentation masks tailored to your use case.

Simplify Your Data Annotation Workflow With Proven Strategies
.png)
