Best Data Labeling User Interface: Features, and Best Practices in 2025
Data labeling is a critical part of developing machine learning models, but it’s often overlooked in terms of efficiency and user experience.
Many data labeling interfaces are clunky, unintuitive, or lack essential features, which slows down the annotation process and leads to errors.
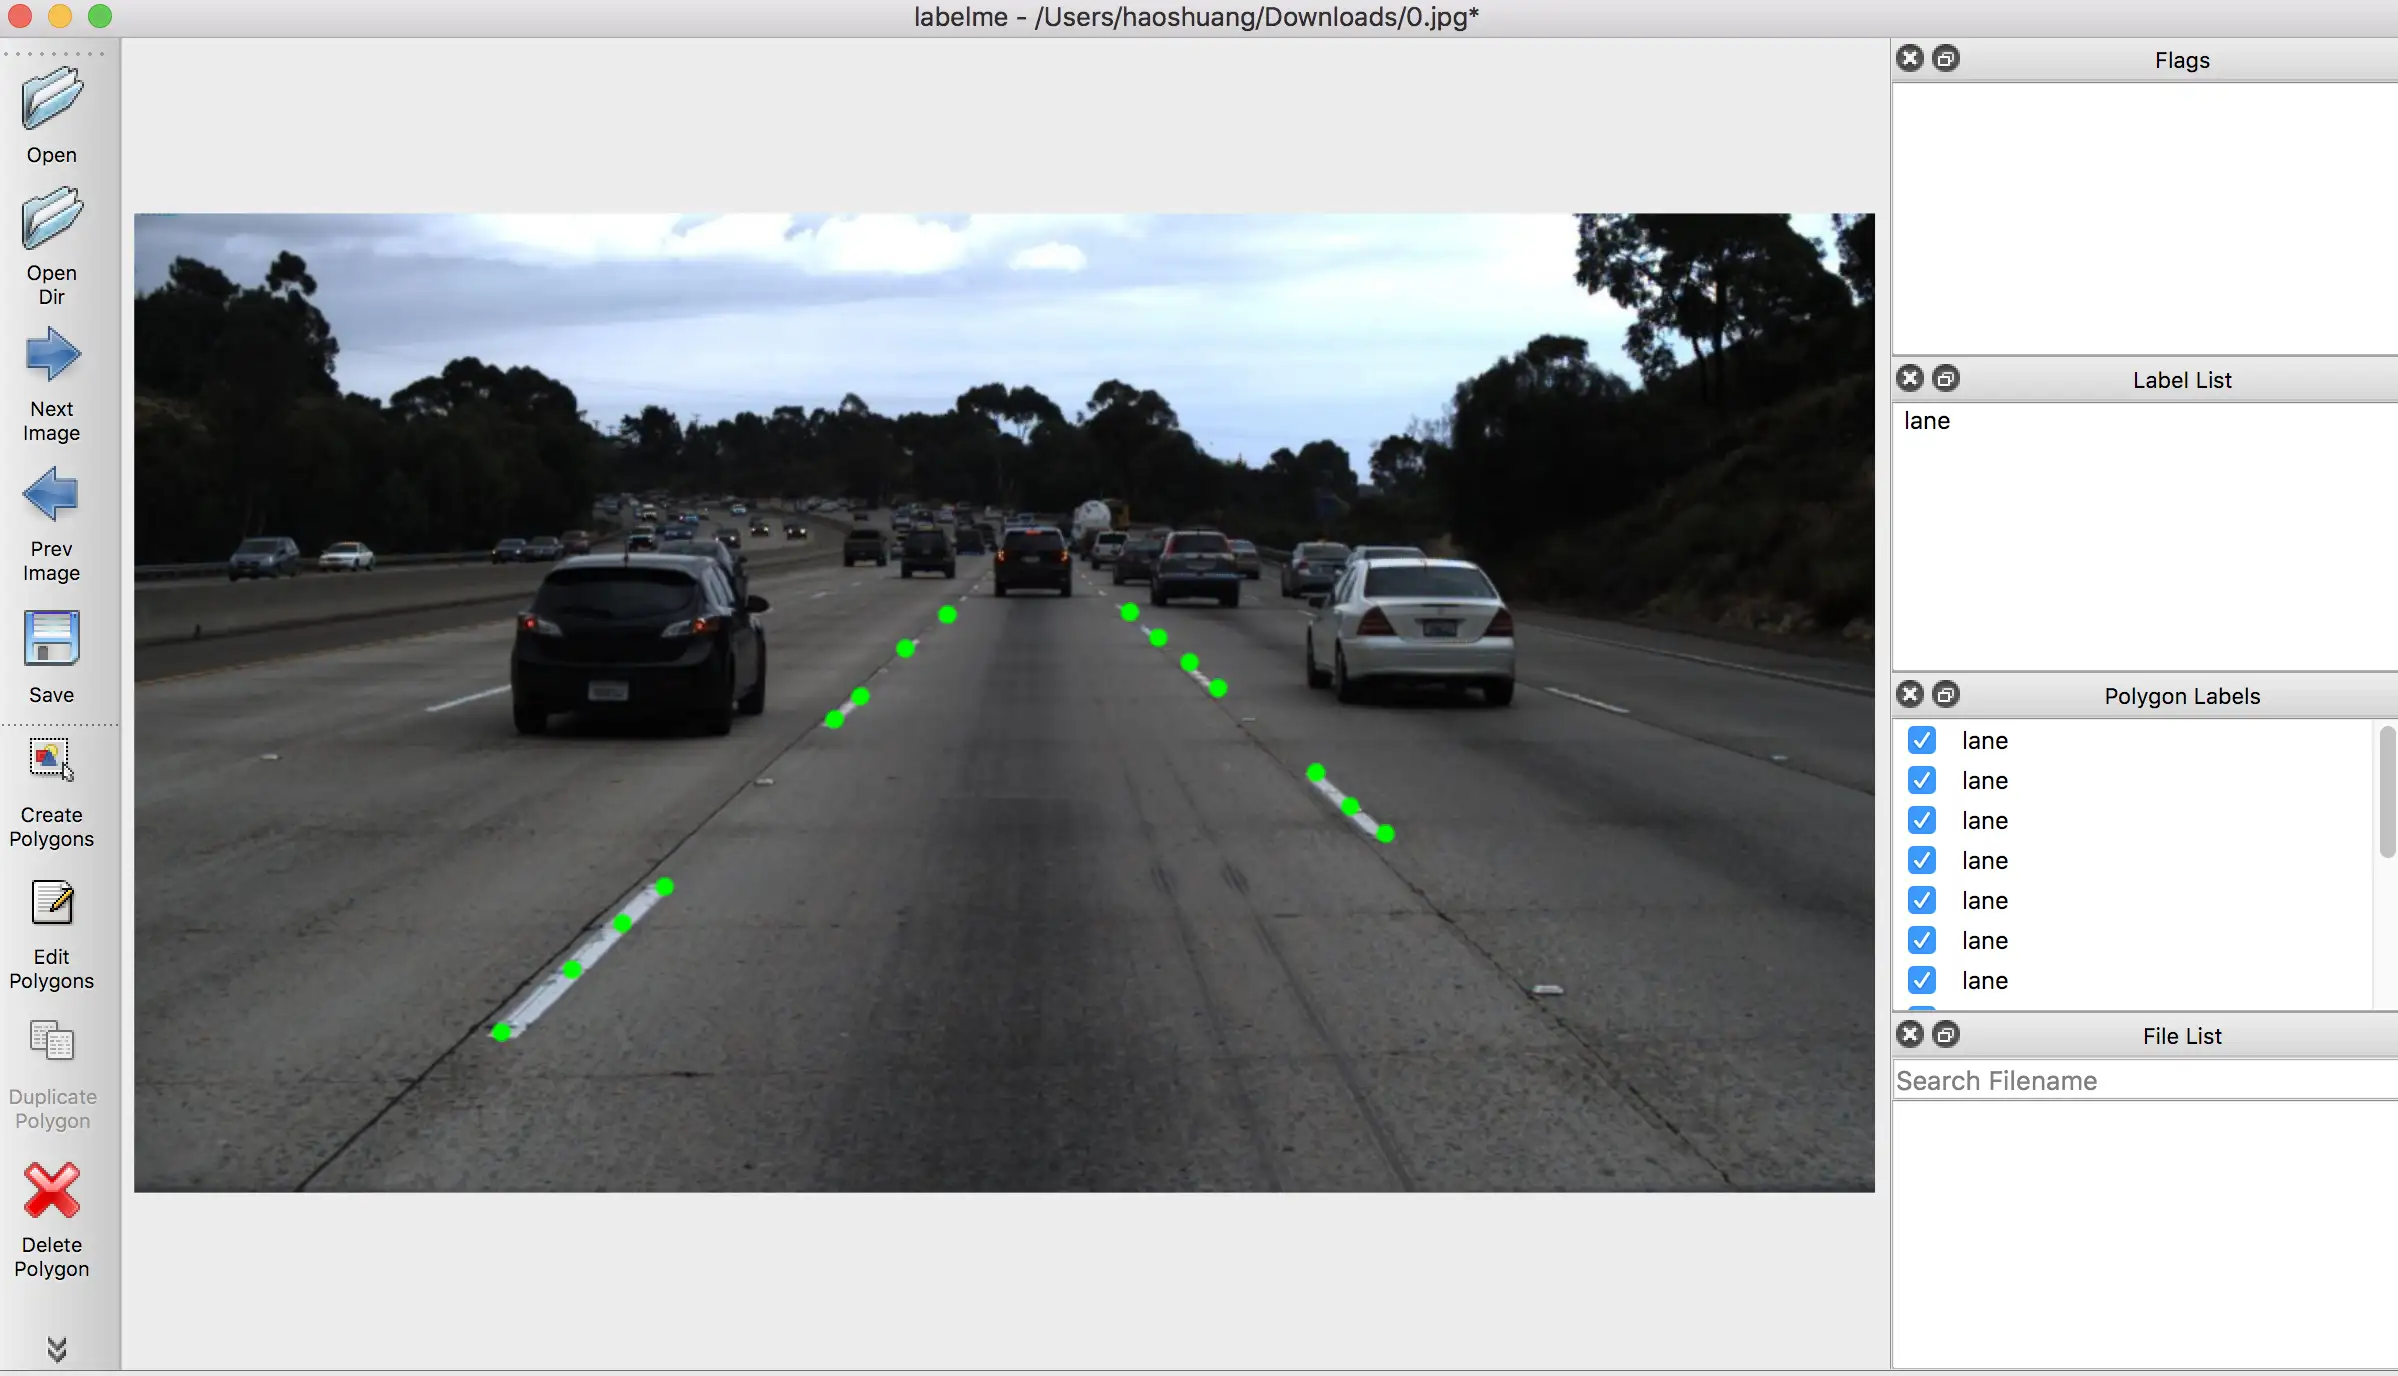
This inefficiency directly affects the quality of labeled datasets and, ultimately, the performance of AI models. For organizations relying on high-quality labeled data, a poor labeling interface can mean longer project timelines, higher costs, and more frustration for labeling teams.
According to research by Cognilytica, over 80% of AI project time is spent on data preparation, including labeling.
Additionally, 57% of machine learning engineers believe that poor-quality data is the biggest challenge to achieving accurate model performance.
Ineffective labeling tools contribute to this problem by increasing the likelihood of errors, inconsistency, and burnout among annotators.
In fact, studies show that improving user experience (UX) in annotation tools can reduce labeling time by up to 30% and improve accuracy by 20%.
To overcome these challenges, mastering data labeling UI design is essential. A well-designed data labeling interface offers intuitive workflows, smart automation features, and robust error-checking tools.
It streamlines the annotation process, reduces cognitive load, and ensures consistency across datasets. In this article, we will explore the key tools, features, and best practices for creating efficient data labeling UIs.
Whether you're developing your own data labeling tool or choosing one from the market, understanding these principles will help you optimize the data labeling process and boost productivity.
Table of Contents
- Importance of a Good Data Labeling UI
- Key Tools for Data Labeling
- How to Make Your Data Labeling UI Efficient
- Conclusion
- Frequently Asked Questions (FAQs)
Importance of a Good Data Labeling UI
1. Efficiency: How a Well-Designed UI Speeds Up the Annotation Process
Efficiency is crucial in data labeling because the process can be time-consuming, especially when handling large datasets. A well-designed UI can significantly reduce the time it takes to complete annotations by providing:
- Logical Layout and Navigation: Clear placement of tools, menus, and controls ensures that annotators can quickly find what they need. A consistent layout reduces the cognitive effort required to navigate the interface.
- Keyboard Shortcuts and Hotkeys: Providing customizable shortcuts for common actions (like zooming, drawing bounding boxes, or switching tools) allows annotators to work faster without relying solely on mouse interactions.
- Automated Tools: Features like auto-labeling, model-assisted labeling, and pre-annotations can significantly cut down repetitive tasks, allowing annotators to focus on verification and correction rather than starting from scratch.
- Batch Processing: Allowing annotators to label multiple items simultaneously or apply changes in bulk reduces the need to repeat the same task multiple times.
- Responsive Performance: A UI that loads images or data quickly, even when handling high-resolution files, ensures that annotators are not waiting for the interface to catch up with their work.
2. Accuracy: How Intuitive Design Reduces Human Error
Inaccuracies in labeled data can lead to poorly performing machine learning models. An intuitive UI design can help minimize these errors by:
- Clear Visual Cues: Well-defined visual indicators (e.g., color-coded annotations, error highlights, and confirmation prompts) help annotators immediately recognize mistakes and correct them.
- Auto-Validation and Real-Time Feedback: Built-in validation rules can alert annotators if they make an error (e.g., overlapping bounding boxes, missing labels). Real-time feedback helps correct errors before they propagate.
- Simplified Annotation Tools: Tools that offer precise control, such as snapping mechanisms for bounding boxes or polygon points, help ensure accurate placements.
- Guided Workflows: Step-by-step instructions and workflows reduce ambiguity, ensuring annotators follow a consistent process.
- Undo/Redo Functionality: Easy undo and redo options allow annotators to correct mistakes quickly without starting over.
3. Annotator Experience: The Role of Good UX in Preventing Burnout and Frustration
Data annotation is repetitive and can quickly lead to fatigue or burnout if the UI is poorly designed. A good UX keeps annotators engaged and reduces frustration by:
- Reducing Cognitive Load: An intuitive interface with clear icons, labels, and workflows minimizes the mental effort required to perform tasks. Annotators can focus on the data instead of struggling with the tool.
- Minimizing Clicks and Redundancy: Interfaces that reduce the number of steps to complete tasks (e.g., a single-click annotation tool) improve productivity and reduce repetitive strain.
- Ergonomic Design: Considerations like easy-to-read fonts, dark/light mode options, and minimal eye strain features contribute to long-term comfort during annotation sessions.
- Progress Tracking and Break Reminders: Features that track progress and suggest regular breaks help annotators manage their workload and reduce burnout.
- Collaboration Features: Easy communication within the tool (e.g., comments, tagging teammates) makes it easier to resolve questions and maintain a sense of teamwork.
4. Scalability: How Good UIs Support Larger Datasets and More Complex Annotation Tasks
As machine learning projects grow, the need for scalable annotation tools becomes critical. A well-designed UI supports scalability by:
- Handling Large Datasets Smoothly: The ability to load, process, and navigate thousands of images or data points without lag or crashes is essential. Efficient memory management and optimized loading processes help with scalability.
- Support for Complex Annotations: Good UIs can handle advanced annotation types (e.g., 3D bounding boxes, video frame sequences, and segmentation masks) seamlessly, allowing teams to work on diverse data types.
- Batch and Bulk Operations: Tools that allow annotators to apply changes to multiple annotations or images at once can speed up the labeling process significantly.
- Modular and Configurable Interfaces: A UI that can be customized for different tasks or project requirements ensures flexibility as the scope of work evolves.
- Integration with Automation: Scalable tools often integrate with AI-assisted labeling and model-in-the-loop workflows, making it easier to manage large datasets without overwhelming annotators.
Key Tools for Data Labeling
1. Labellerr
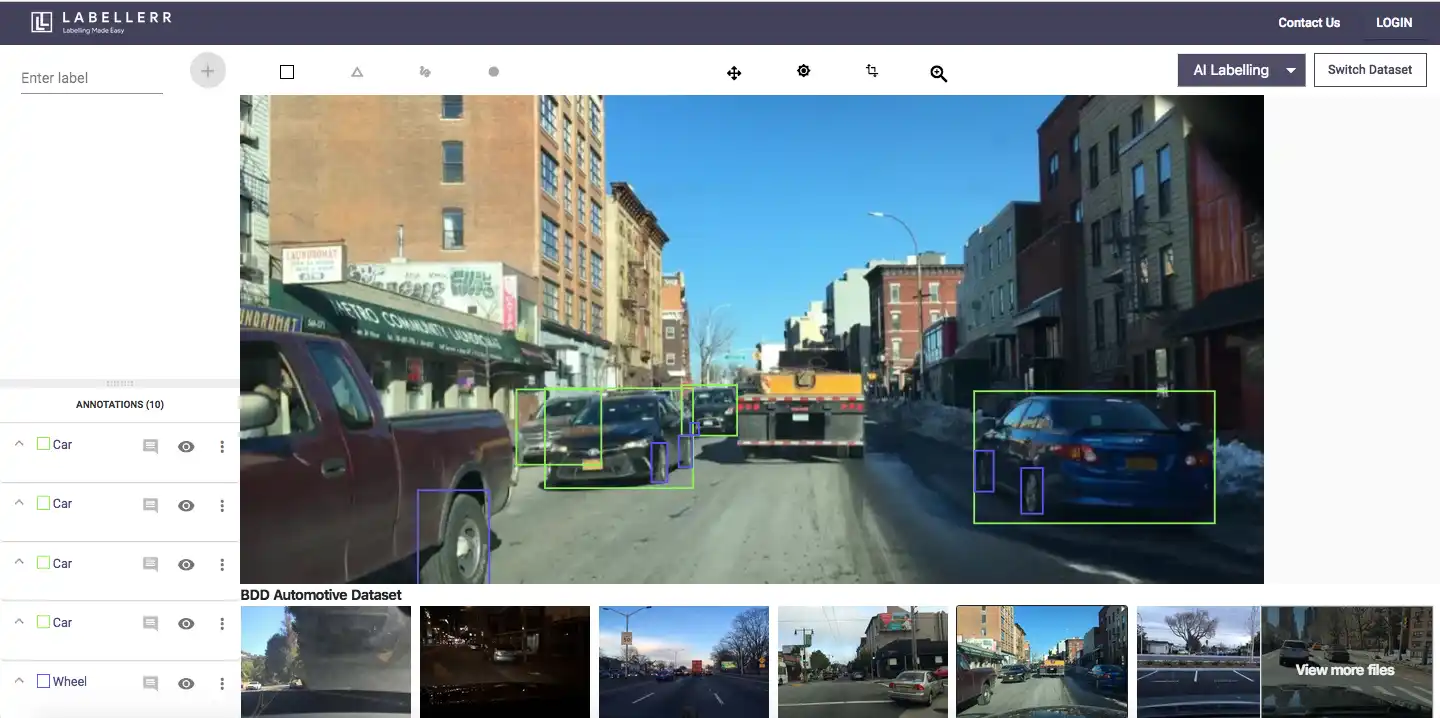
Labellerr is designed to streamline data labeling with the power of AI assistance and automation. It caters to organizations that need efficient, scalable, and accurate data labeling for computer vision, NLP, and other AI tasks. Labellerr’s UI focuses on intuitive workflows, automation, and seamless integration with existing machine learning pipelines.
Notable UI Features
- AI-Assisted Annotation: Pre-annotation powered by machine learning models to speed up labeling.
- Intuitive Layout: Easy-to-navigate interface with clearly organized tools.
- Collaboration Tools: Support for team-based projects with role assignments and review workflows.
- Real-time Feedback: Immediate validation to detect errors and inconsistencies during annotation.
Pros and Cons
- Pros:
- AI-assisted automation saves time.
- User-friendly interface with minimal learning curve.
- Supports multiple data types: images, text, and video.
- Cons:
- Advanced features may require training.
- Limited offline functionality.
G2 Review
⭐ 4.7/5 – Users praise Labellerr for its automation capabilities and user-friendly design, making large-scale annotation projects efficient.
2. Labelbox
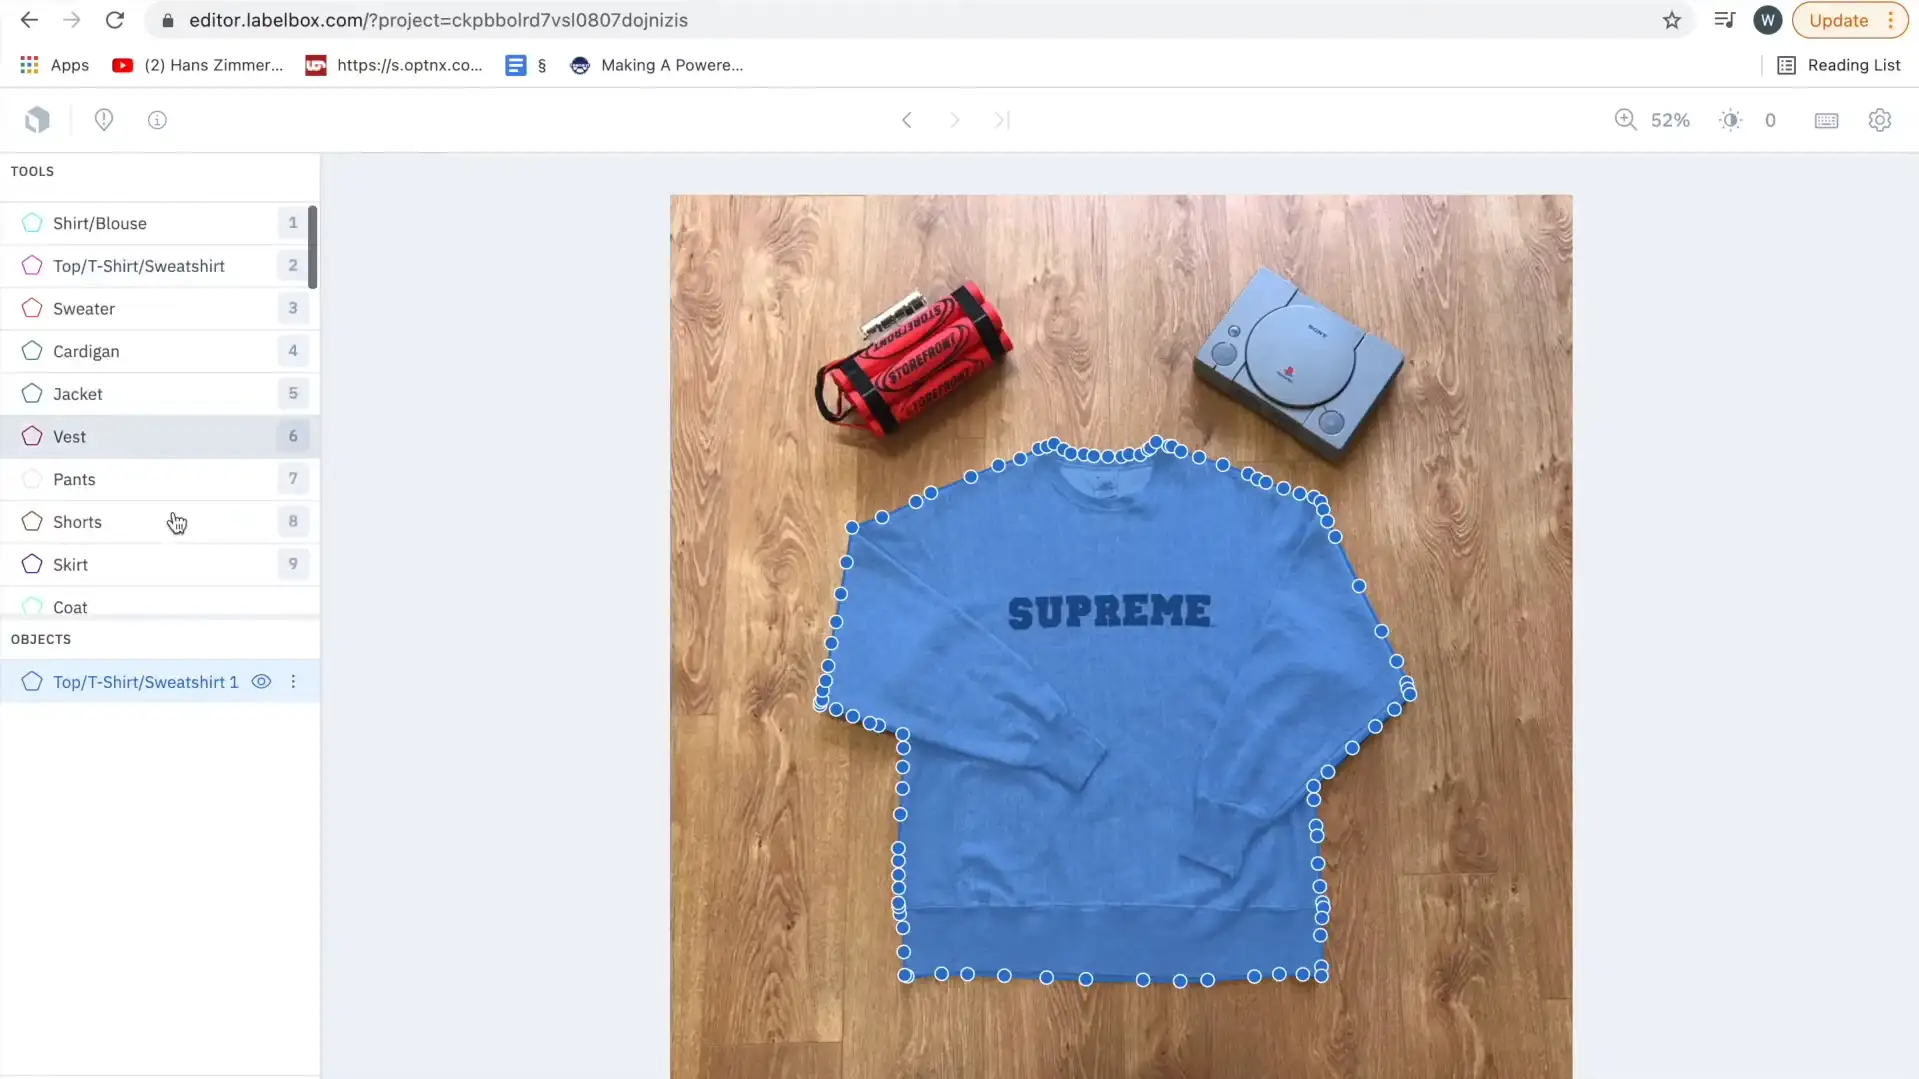
Labelbox is a data labeling platform built for teams that need collaborative workflows, project management, and integration with machine learning pipelines. It supports a wide range of annotation types, including images, video, and text, making it suitable for diverse use cases.
Notable UI Features
- Collaboration Dashboard: Assign tasks, track progress, and review annotations easily.
- Intuitive Annotation Tools: Simple tools for bounding boxes, segmentation, and keypoints.
- Model-Assisted Labeling: Integrate models to generate pre-labels and refine annotations.
- Project Management Tools: Visual dashboards for task tracking and reporting.
Pros and Cons
- Pros:
- Excellent for team collaboration and project management.
- Supports integration with custom ML models.
- Real-time annotation progress tracking.
- Cons:
- Can become expensive for larger datasets.
- Occasional performance issues with large projects.
G2 Review
⭐ 4.5/5 – Users appreciate Labelbox’s collaborative features and intuitive UI but note that the cost can be high for large-scale projects.
3. SuperAnnotate
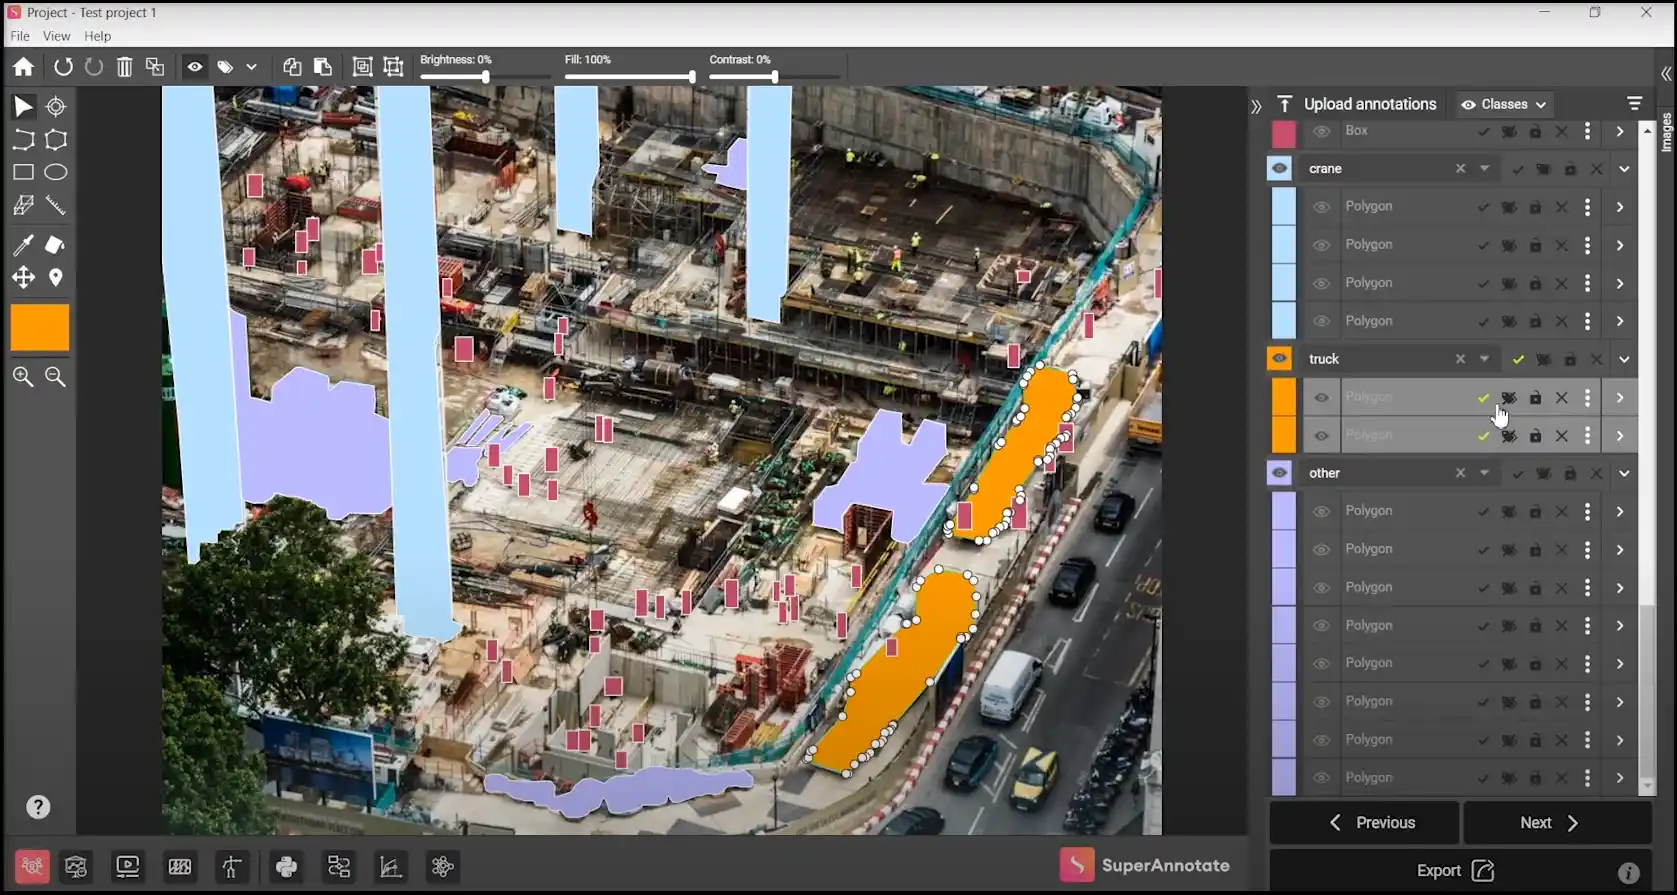
SuperAnnotate focuses on high-quality data labeling with an emphasis on automation, quality control, and scalability. It supports image, video, and text annotations and is ideal for teams that require strict quality assurance and productivity optimization.
Notable UI Features
- Automation Tools: AI-assisted labeling and smart annotation suggestions.
- Quality Control Workflows: Built-in tools for reviews, feedback, and task verification.
- Rich Annotation Tools: Advanced options for object detection, segmentation, and keypoints.
- Team Collaboration: Assign tasks and roles for streamlined teamwork.
Pros and Cons
- Pros:
- Robust automation and quality control features.
- Supports multiple annotation types and formats.
- Scalable for large projects.
- Cons:
- The interface can be overwhelming for new users.
- Limited free-tier features.
G2 Review
⭐ 4.6/5 – Users love the automation and quality control features but mention a learning curve for new users.
4. Amazon SageMaker Ground Truth
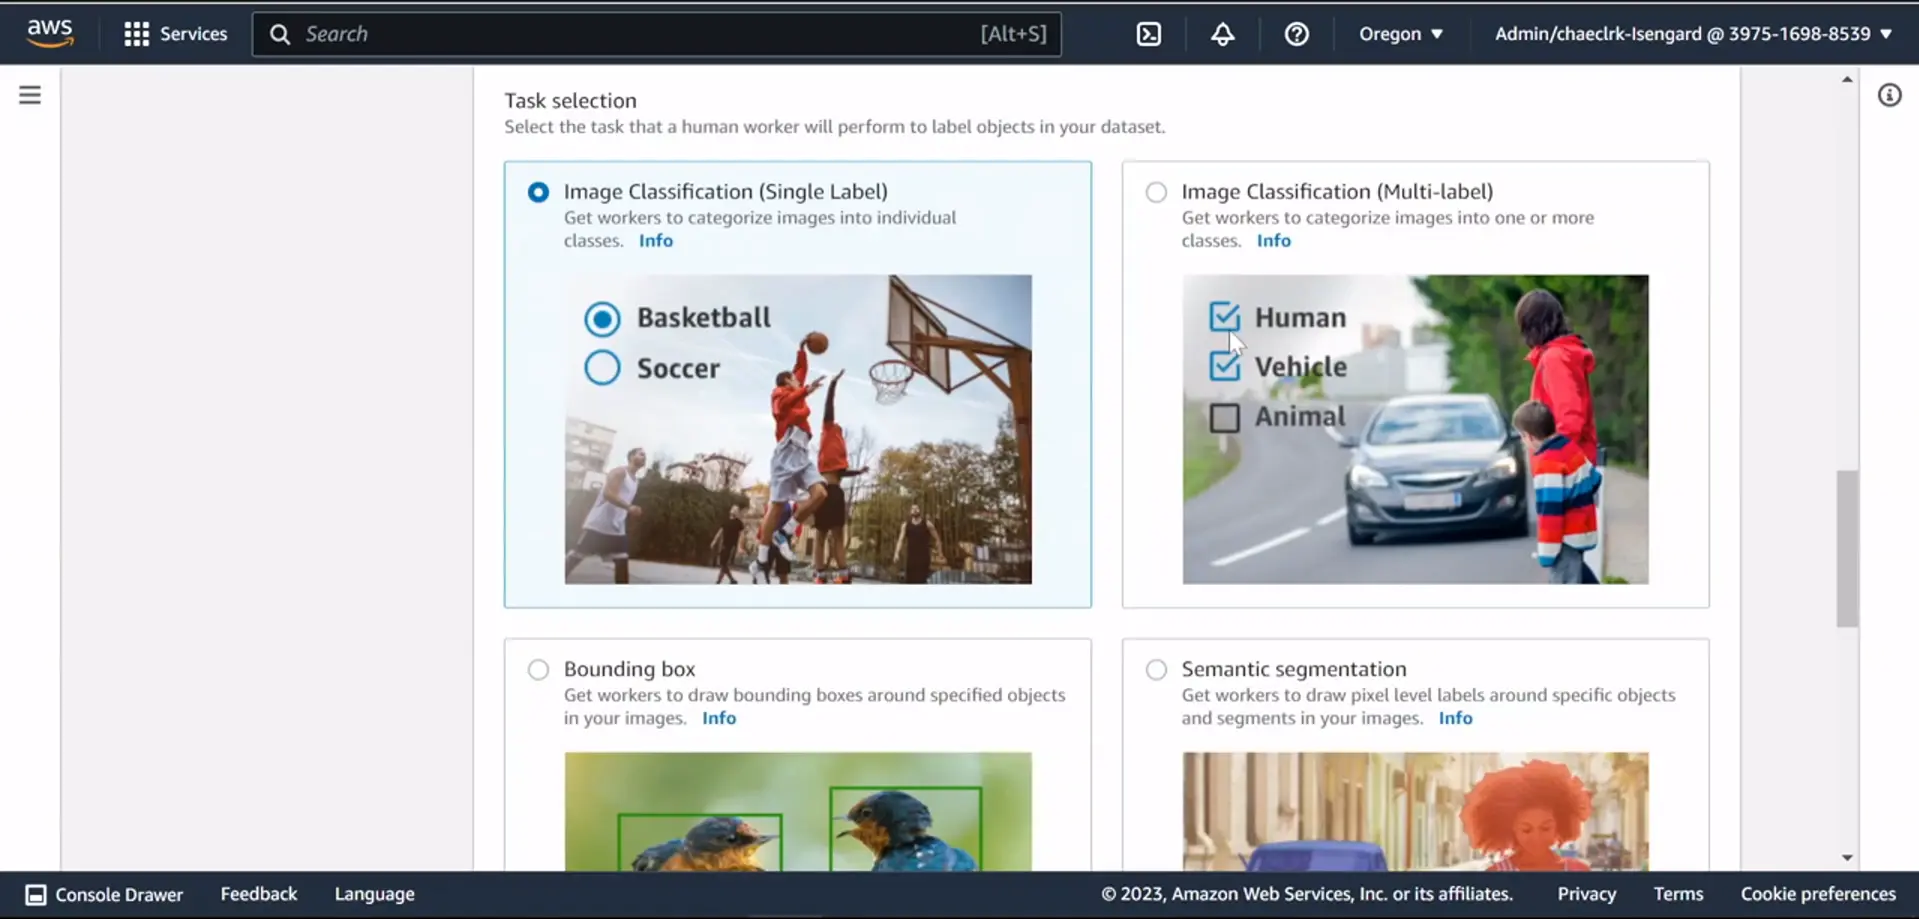
Amazon SageMaker Ground Truth is a fully managed data labeling service designed for scalability and integration with AWS machine learning workflows. It supports a variety of annotation tasks, including image, text, and video labeling.
Notable UI Features
- Scalable Workflow: Designed for large datasets and enterprise-level projects.
- Automation and AI Integration: Built-in support for automated labeling with machine learning models.
- Managed Services: AWS handles task distribution, worker management, and quality control.
- Customizable Templates: Pre-built and customizable templates for various annotation tasks.
Pros and Cons
- Pros:
- Seamless integration with AWS services.
- Highly scalable and managed by AWS.
- Automation reduces manual effort.
- Cons:
- Requires familiarity with AWS.
- Cost can escalate with large datasets.
G2 Review
⭐ 4.3/5 – Users highlight the scalability and integration with AWS but mention complexity for those new to AWS services.
5. CVAT (Computer Vision Annotation Tool)
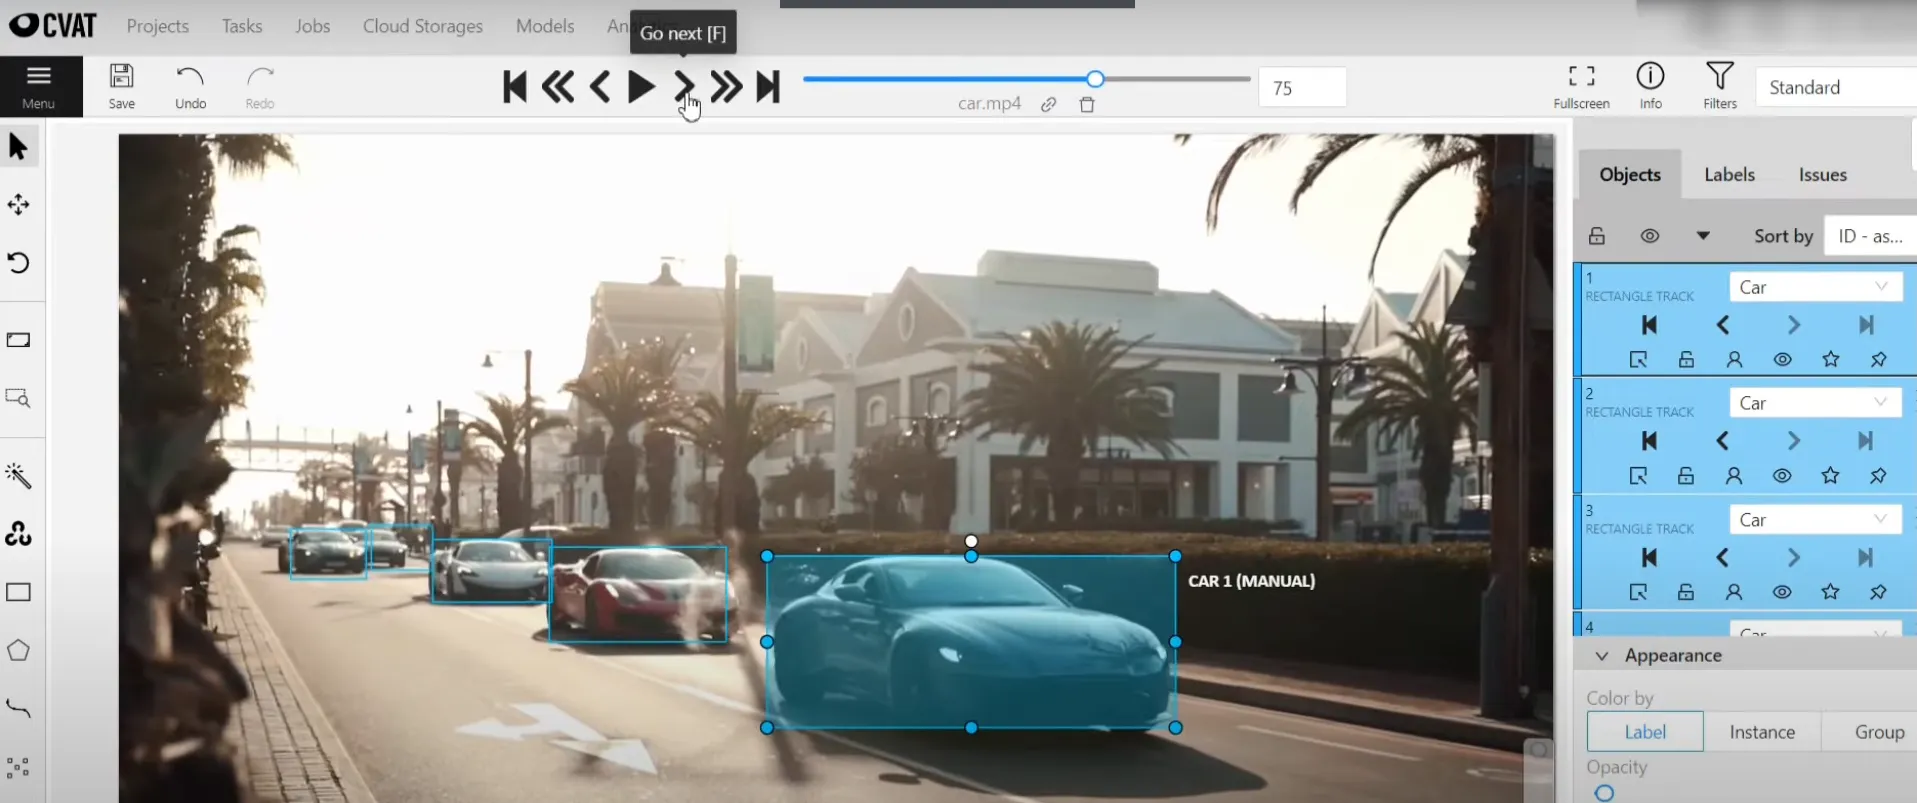
CVAT is an open-source data labeling tool designed for computer vision tasks like image and video annotation. It’s highly customizable and popular among users who need a free yet powerful tool for object detection and segmentation tasks.
Notable UI Features
- Customizable Interface: Adapt the UI to suit specific workflows and tasks.
- Multiple Annotation Types: Support for bounding boxes, polygons, polylines, and keypoints.
- Keyboard Shortcuts: Extensive hotkey support for efficient labeling.
- Open-Source Flexibility: Community contributions and self-hosting options.
Pros and Cons
- Pros:
- Free and open-source.
- Highly customizable and extensible.
- Supports a wide range of annotation types.
- Cons:
- UI can be less intuitive for beginners.
- Requires setup and maintenance for self-hosting.
G2 Review
⭐ 4.4/5 – Users appreciate the flexibility and cost-effectiveness but note the learning curve and need for technical setup.
6. VGG Image Annotator (VIA)

VGG Image Annotator (VIA) is a lightweight, browser-based annotation tool for images and videos. Developed by the Visual Geometry Group at Oxford, it’s designed for quick and simple labeling tasks without the need for extensive setup.
Notable UI Features
- Simple Interface: Minimalist design with essential annotation tools.
- No Installation Required: Runs directly in the browser.
- Supports Multiple Formats: Export annotations in JSON, CSV, and other formats.
- Lightweight and Fast: Ideal for quick projects or small datasets.
Pros and Cons
- Pros:
- Lightweight and fast.
- No setup or installation needed.
- Free and easy to use for basic tasks.
- Cons:
- Limited features for complex annotations.
- Not suitable for large-scale projects or team collaboration.
G2 Review
⭐ 4.2/5 – Users appreciate its simplicity and ease of use for quick tasks but find it lacking for more complex workflows.
How to Make Your Data Labeling UI Efficient
1. Intuitive Navigation
Efficient navigation is the foundation of a productive data labeling UI. It reduces the time spent on finding tools and helps annotators stay focused on their tasks.
- Easy-to-Access Toolbars and Menus: Place frequently used tools like zoom, pan, and annotation types within immediate reach. Avoid burying critical features in nested menus.
- Logical Layout: Arrange tools logically for tasks like drawing, labeling, and reviewing. A consistent layout helps annotators quickly learn and remember where everything is.
- Quick Navigation Controls: Provide options for panning, zooming, and scrolling with intuitive controls or gestures.
- Keyboard Shortcuts: Offer hotkeys for common actions like drawing a bounding box, saving a label, or switching tools to reduce reliance on the mouse.
Best Practice
- Avoid Clutter: Keep the interface clean by displaying only essential tools and menus. Hide advanced features behind toggles or settings menus to prevent overwhelm.
2. Robust Annotation Tools
Efficient annotation requires versatile tools that cater to different data types and tasks.
- Support for Multiple Annotation Types: Provide tools for bounding boxes, polygons, segmentation masks, keypoints, and text labels to support diverse labeling tasks.
- Flexible Editing Options: Allow annotators to easily modify or delete annotations without starting over. Include features like point adjustment, resizing, and annotation merging.
- Guided Annotation Workflows: Offer step-by-step workflows for complex tasks to reduce mistakes and ensure consistency.
Best Practice
- Minimize Clicks: Simplify the process of switching between tools or editing annotations by reducing the number of clicks required.
3. Automation and AI Assistance
Incorporating automation can dramatically speed up the annotation process and reduce the manual workload.
- Auto-Labeling: Use AI to generate preliminary annotations for review and refinement by human annotators.
- Model-Assisted Labeling: Integrate machine learning models to assist with labeling tasks, offering predictions and suggestions that can be corrected or approved.
- Pre-Annotated Datasets: Allow for importing pre-labeled data to speed up initial labeling efforts.
- Smart Suggestions: Implement AI-based suggestions for repetitive tasks, like label recommendations or auto-completing shapes.
Best Practice
- Balance Automation and Human Oversight: Ensure that automated labels can be easily verified or corrected to maintain high-quality output.
4. Error Prevention and Quality Control
Maintaining high accuracy in data labeling depends on effective error prevention and robust quality control features.
- Auto-Validation: Implement real-time validation checks to flag inconsistencies, missing labels, or overlapping annotations.
- Consistency Checks: Include automated rules to ensure annotations follow project guidelines (e.g., minimum bounding box size, correct label names).
- Review Workflows: Enable multi-stage review processes where annotations can be approved or flagged for correction.
- Real-Time Feedback: Provide instant visual cues (e.g., color changes, warnings) when potential errors are detected.
Best Practice
- Support Undo/Redo: Allow annotators to quickly correct mistakes with undo/redo functionality to reduce frustration and improve productivity.
5. Collaboration Features
Effective collaboration tools are essential for teams working on large-scale projects.
- Multi-User Support: Enable multiple annotators to work on the same project simultaneously.
- Comment Sections and Notes: Allow team members to leave comments or notes on specific annotations to resolve questions or provide feedback.
- Task Assignment: Facilitate task management by assigning specific datasets or annotation tasks to different users.
- Audit Logs: Track all changes and user activity for accountability and transparency.
Best Practice
- Regularly Gather User Feedback: Collect feedback from annotators and reviewers to improve collaboration workflows and resolve pain points.
6. Keyboard Shortcuts and Hotkeys
Speed up the annotation process by offering customizable keyboard shortcuts.
- Hotkeys for Common Tasks: Provide shortcuts for actions like drawing shapes, saving labels, switching tools, and navigating through data.
- Customizable Shortcuts: Allow users to configure hotkeys based on their preferences and workflow needs.
Best Practice
- Keep Shortcuts Intuitive: Use familiar key combinations to reduce the learning curve and enhance efficiency.
7. Customization Options
Every annotation project is different, so a customizable UI can improve efficiency.
- Workflow Flexibility: Allow users to adapt the interface for different types of data (e.g., images, videos, text).
- Configurable Toolbars: Enable users to rearrange or hide tools based on their workflow preferences.
- Theme Options: Offer light and dark modes to accommodate different working conditions and reduce eye strain.
Best Practice
- Adapt to Data Types: Ensure the UI can handle different annotation types, such as bounding boxes for images or transcripts for text.
8. Performance and Responsiveness
An efficient UI must perform smoothly, even when handling large datasets.
- Fast Loading Times: Optimize the interface to load images, videos, and annotations quickly.
- Lag-Free Interaction: Ensure smooth performance when annotating high-resolution images or large video files.
- Batch Processing: Allow for bulk actions like applying labels or exporting multiple annotations simultaneously.
Best Practice
- Optimize for Large Datasets: Design the UI to handle thousands of images or data points without slowdowns.
9. Accessibility and User Experience (UX)
A good UX ensures the UI is accessible to all annotators, including those with specific needs.
- Colorblind-Friendly Design: Use color schemes that accommodate colorblind users.
- Clear Visual Cues: Ensure labels, warnings, and annotations are visually distinct and easy to interpret.
- Minimal Cognitive Load: Simplify workflows and provide tooltips to guide users.
Best Practice
- Gather UX Feedback: Regularly ask annotators about their experience and pain points to improve usability.
Conclusion
An efficient data labeling UI is not just a nice-to-have feature; it’s a critical component for ensuring the success of machine learning projects.
Poorly designed interfaces contribute to slow annotation processes, inconsistent data quality, and annotator burnout, ultimately impacting the performance of AI models.
Given that data preparation, including labeling, takes up over 80% of AI project time, investing in a well-designed data labeling UI is essential.
By incorporating intuitive navigation, robust annotation tools, automation, error prevention features, and collaboration support, you can create a UI that streamlines workflows, reduces cognitive load, and improves accuracy.
Best practices like minimizing clicks, providing real-time feedback, and supporting undo/redo functionalities ensure that annotators remain productive and engaged.
Tools like Labellerr, Labelbox, SuperAnnotate, Amazon SageMaker Ground Truth, CVAT, and VGG Image Annotator offer various strengths in automation, scalability, and usability.
Choosing the right tool, or designing your own with these principles in mind, will optimize the data labeling process, reduce project timelines, and improve dataset quality.
Ultimately, mastering data labeling UI design isn’t just about enhancing the user experience—it’s about setting the foundation for successful, high-performing machine learning models.
Frequently Asked Questions
1. What are the key features to look for in a data labeling UI?
When evaluating a data labeling UI, key features to consider include:
- Intuitive Navigation: Easy-to-access toolbars, logical layout, and keyboard shortcuts.
- Annotation Tools: Support for different annotation types like bounding boxes, polygons, masks, and keypoints.
- Automation: AI-assisted labeling, auto-labeling, and smart suggestions to speed up tasks.
- Error Prevention: Real-time feedback, auto-validation, and quality control workflows.
- Collaboration: Multi-user support, task assignments, comments, and audit logs.
These features help improve efficiency, accuracy, and overall productivity during data labeling.
2. How does a well-designed data labeling UI improve annotation accuracy?
A well-designed UI improves accuracy by:
- Providing Clear Visual Cues: Color-coded annotations, error highlights, and prompts help annotators detect mistakes easily.
- Real-Time Validation: Immediate feedback on potential errors (e.g., overlapping labels or missing annotations) helps correct mistakes on the spot.
- Simplified Annotation Tools: Precision controls like snapping points or auto-completion features ensure correct label placements.
- Guided Workflows: Step-by-step instructions ensure consistency in labeling tasks.
These elements reduce human error and lead to higher-quality labeled data.
3. What are some best practices for designing an effective data labeling UI?
To design an effective data labeling UI, follow these best practices:
- Keep the Interface Simple: Avoid clutter by focusing on essential tools and features.
- Minimize Clicks and Redundancy: Streamline workflows to reduce unnecessary steps.
- Provide Real-Time Feedback: Validate annotations instantly to catch errors early.
- Support Undo/Redo: Allow quick corrections to minimize frustration.
- Gather User Feedback: Regularly ask annotators for feedback to continuously improve the interface.

Simplify Your Data Annotation Workflow With Proven Strategies
Download the Free Guide

